The instructions below have been customized for your project "".
Customize these instructions for the project
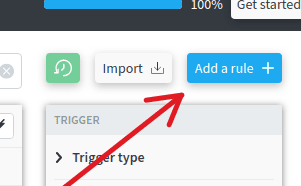
Create a rule
Some concepts : rules and ruleset
A redirection.io rule is basically made of two items:
- a Trigger, which defines the conditions when the rule must be executed ;
- an Action, which defines which operations the rule must perform.
It is also possible to associate Examples to a rule, which help test and check the result of the rule, in a similar way to unit tests.
The complete list of Rules is called the Ruleset. When you publish a Ruleset, it gets applied to your website, which means that every request made to your website is filtered against the Ruleset. In other words, for each request performed to your site, the redirectionio-agent installed in your infrastructure evaluates which Rules must be executed for this request.
Triggers
Triggers define the way redirection.io agents will match incoming requests before performing an action. Triggers are based on the request URL pattern, and can include several other conditions: HTTP method, HTTP headers, etc. See the Triggers and markers reference page for more information.
Actions
When a rule is triggered by a request, one or several Actions can be executed. Of course, the main purpose of redirection.io is to run redirections, but we can do much more! Here is the list of the cumulative actions that redirection.io can execute:
- Redirection: execute an HTTP redirection;
- Page not available: return an HTTP error, for urls that you knowingly want to disable (
404or410); - HTML Meta-Tag override: to define default meta tags, or override existing meta tags;
- Custom HTTP response headers: to add, override or remove one or several HTTP headers;
- Structured data: this action allows to inject schema.org structured data within the page body;
- Custom HTML Code: this action allows to inject custom HTML code in the page.
All those actions are precisely defined in the Actions reference page.
How to create a rule
Of course, creating and managing rules is the way to go in order to benefit from redirection.io. Creating rules is rather easy and straightforward:
-
-

-
-
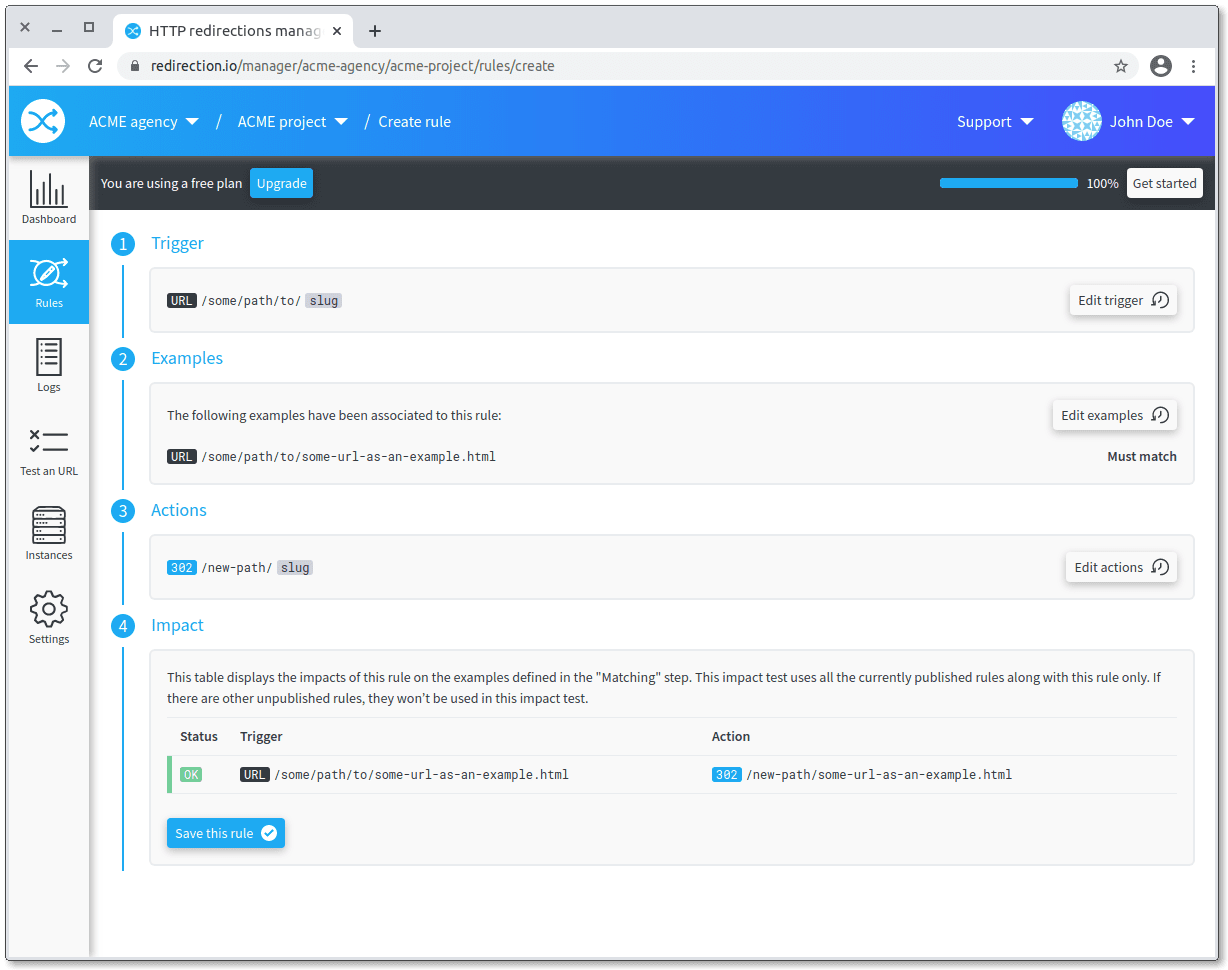
- a Trigger section allows to configure the conditions that will trigger the execution of the rule;
- Examples allow to attach example requests to this rule. These examples will be used in the Impact step, to check that the rule behaves like you expect it. If your project has already logged some traffic, examples can be generated based on your real traffic logs;
- the Action step allows to define which actions must be executed when the rule is triggered;
- the Impact step displays how the rule will behave, once published.
You may use the "Add marker" button to insert markers in the "Source URL". Markers are re-usable items that we will collect parts of the incoming URL. For example, if the URL to match is of the form
/shop/products/<ID>with<ID>an integer, you can type/shop/products/and then hit the "Add marker" button, and insert an "integer" marker (name it as you like). In the "Action" section, you can then use this newly created marker to re-inject it in the redirection target. Read more on markers -
-
If everything looks right, click the "Save this rule" button. The rule will be saved, but won't be immediately applied to your production: you first have to "publish" the changes.


Temporarily enable or disable a rule
In certain circumstances, you may need to disable a rule for a temporary period. You could delete the rule altogether, as it is always possible to re-add it later using imports or using the rules version history, but we offer a more straightforward convenience for such cases.
In the "Impact" step, you can choose to enable or disable a rule. If a rule is disabled, it will not be used by your instances (both "production" and "test" instances). It will still exist, and you can re-enable it when needed, but it will simply have no impact on your website, as if it did not exist.

In the rules list, you can filter the rules list using the "Enabled" filter. This can be helpful to retrieve a set of disabled rules that you want to re-enable.
Testing the rules
One of the real advantages of redirection.io, compared with creating redirections using other solutions, is that we can test a set of rules before publishing them in production.
The visual assistance tools provided in the manager are very useful for ensuring that you won't break a part of your website or other existing redirections when creating or publishing new rules.
Verify how one rule works
When creating or editing a rule, the last step before saving the changes is named the "Impact" step. During this step, redirection.io computes the effect of the currently edited rule, along with all the other rules of the ruleset, for each of the examples that have been attached to the current rule.

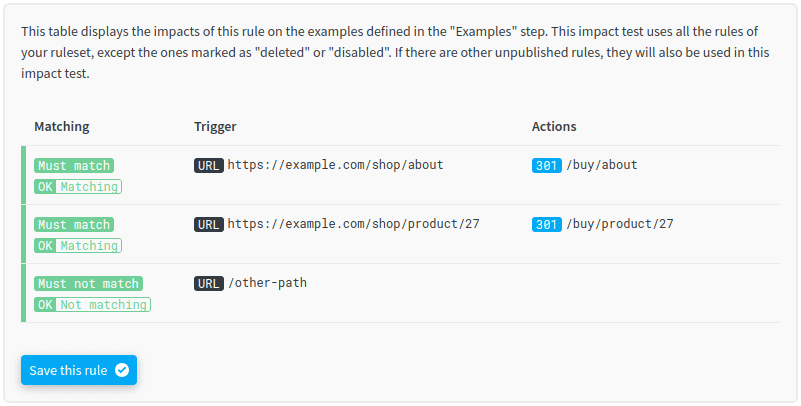
For each sample request, a line in the "Impact" table shows how redirection.io will handle this request:
- Matching: on the left part of the table, the "Matching" column describes the status of this example request. Remember that, for each example request, you can define if it must trigger the currently edited rule or not? This is here that this setting proves useful:
- in the first two lines, the examples are expected to trigger the current rule ("Must Match"), and the redirection.io impacts engine has checked that the rule will be triggered. This is why these two lines are displayed in green color.
- on the third line, the manually added example
/other-pathhas been evaluated and will not trigger the current rule, as we expected it - this examples passes the impact test.
- Trigger: in the "Trigger" column, there's a reminder of the request conditions defined in the example associated with the rule
- Actions: in the "Actions" column are displayed the actions that are expected to be executed by redirection for this example request. For instance, for the first line, a request on
https://example.com/shop/aboutwill cause redirection.io to generate a 301 redirection to/buy/about. The actions displayed in this column are the cumulative total of all the actions produced by all the rules. In other words, even if the current rule is not triggered by the example request (this is the case for the 3rd example above), you may see actions displayed in the "Actions" column - those actions are simply generated by other rules of the ruleset.
The "Impact" step of the rules creation / edition provides more inspection tools. Click on the impact line, and you will get a dedicated panel with three tabs, which explain:
- why the current rule is triggered (or not) by the example request. Each part of the rule trigger is evaluated, so you can locate which part of the trigger does not work as you expected it;
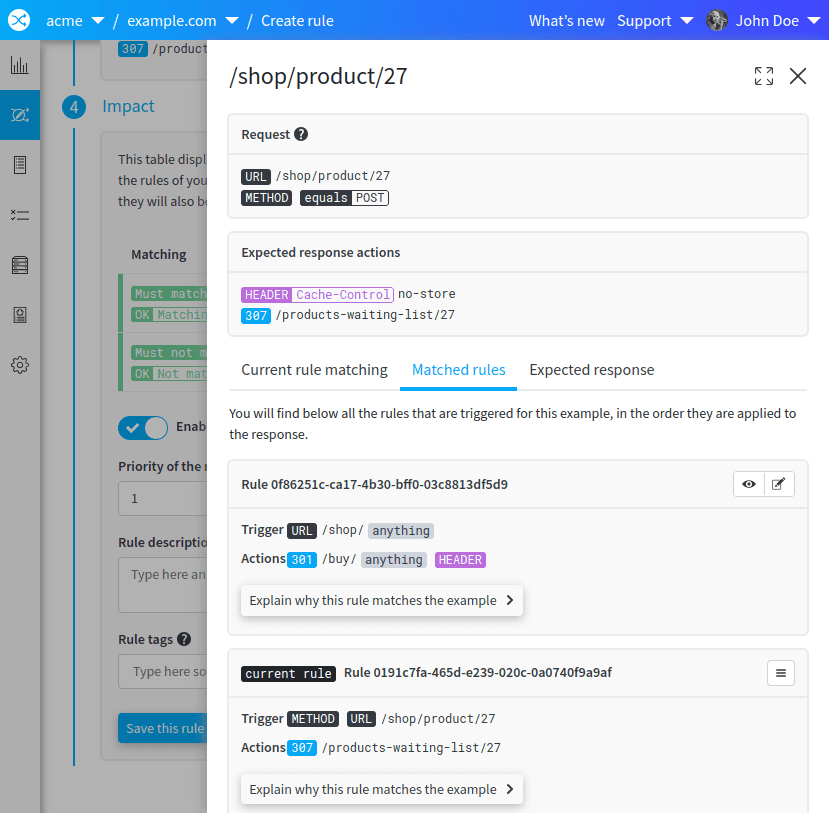


Note that, during this "impact" step, only the actions configured in redirection.io rules will be displayed. If your website or other server components perform a redirection or any other action, it won't be displayed on this screen.
Possible statuses for example rules
In the "impact" step table, each of the example request can have one of the following statuses:
| Status | Description |
|---|---|
 |
You expect this example request to trigger the current rule, and the redirection.io rule engine has confirmed that this rule will be triggered for such a request. |
 |
You expect this example request not to trigger the current rule, and the redirection.io rule engine has confirmed that this rule will not be triggered for such a request. |
 |
You expect the example request to trigger the current rule, but the redirection.io rule engine can not confirm that this rule will be triggered for such a request. |
 |
You expect this example request not to trigger the current rule, but the redirection.io rule engine has confirmed that this rule will be triggered for such a request. |
 |
The rule was expected to be triggered, and the redirection.io rules engine has confirmed that it will be the case. However, a warning has been raised with this rule, because some of its actions are being overridden by actions defined in higher priority rules. This is not necessarily a problem. |
 |
The rule was expected to be triggered, and the redirection.io rules engine has confirmed that it will be the case. However, a warning has been raised with this rule. You can hover the warning symbol to get more information of the issue. Most of the time, it can be because this rule is part of a redirections chain (at least two successive redirects) that you could simplify by creating a new rule to avoid chaining redirection responses. Another reason for such a warning status can be that all the actions defined in the currently edited rule are being overridden by higher priority rules. |
 |
The rule was expected to be triggered, and the redirection.io rules engine has confirmed that it will be the case. However, an error has been raised with this rule, and you can hover on the error symbol to get explanations. For example, the error can be a redirection loop that has been detected. Most of the time, you should change this rule before saving it. |
redirection chains and loops detection is made by the redirection.io rules engine using the rules configured in redirection.io. If your backend service generates other redirects, that redirection.io is not aware of, the rules engine can not include those redirections in the redirect loops & chains detection tool.
Check how a URL will be handled
You have deployed a ruleset and, for one reason or another, you do not understand why a given URL is redirected on your website (or, on the contrary, why this URL is actually not redirected).
In order to analyze what is happening for a given request, redirection.io provides the "Test the rules" page. This part of the manager lets you inspect a specific request, and explains why it triggers a rule (or not).
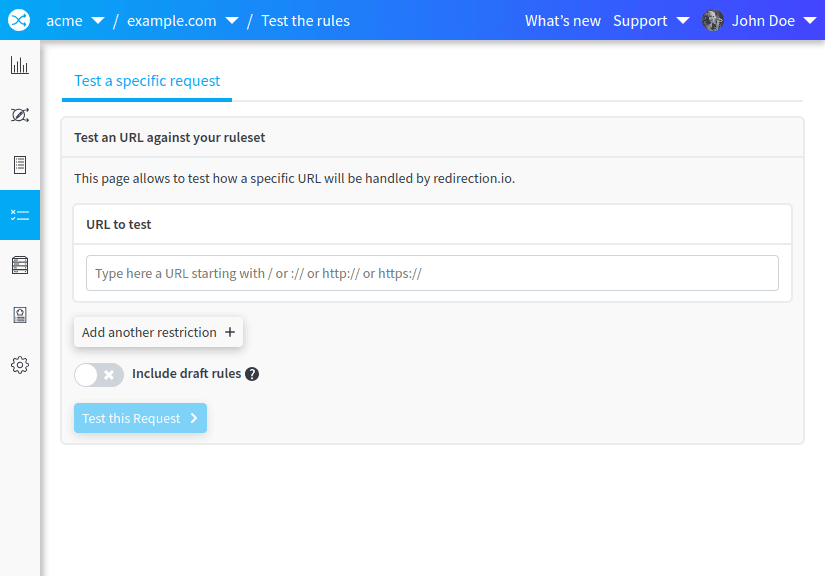
- enter the URL of the page that you want to test
- if there are additional request conditions that you want to evaluate (the HTTP method, a request header, a source IP address, etc.), add it to the request to be tested
- hit the "Test this Request" button to see the inspection results.

Once the inspection is completed, if at least a rule has been found to be executed for the tested request, you will get some insights on what is happening:

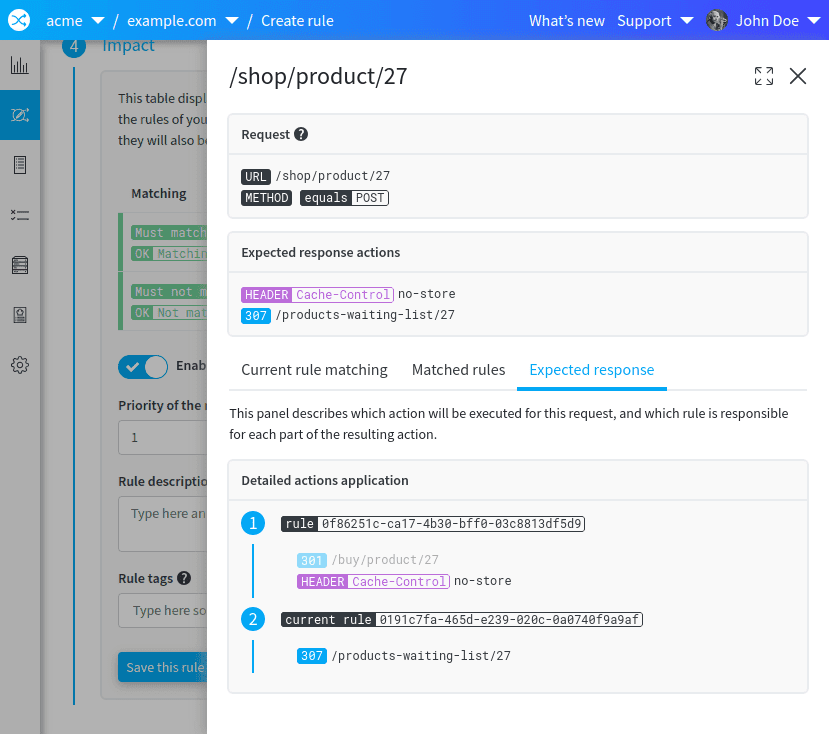
The second tab gives an action-level inspection of the response that would be generated by redirection.io for such a request. Overridden actions are displayed with a partial opacity, to show that they've been overridden;

For example, in the above capture, we can see that, for a POST request on the path /buy/products/27, the resulting actions that will be performed by redirection.io come from two separate rules:
- the first rule add a
Cache-Controlresponse header; - and the second rule overrides the first one in order to define the redirect
Locationto/products-waiting-list/27.
Last but not least, provided the tested URL is an absolute URL, redirection.io offers the possibility to trigger a real HTTP request to check if the real-life response matches the expected response computed by the rules engine.
- hit the "Perform a live request" on the right of the page
- then, hit the button "Send an HTTP request"
After a few seconds, you should see a comparison between the response expected properties and their actual values. For example:

Once the real response is displayed, you can inspect the response obtained by redirection.io for this request.
There can be many reasons why the real response differs from the theorical response computed from the rules:
- redirection.io is not installed on the website/path that you are testing;
- the redirection.io agent installed on your website is not yet up to date. Please retry in a few seconds;
- the redirection.io agent integration used on your website is an old or deprecated version;
- another component of your infrastructure interferes and generated a different response (or transformed the response) for this URL.
Check all the rules of the ruleset
When a ruleset grows, it can become very challenging to monitor each rule one by one. There's always a point where, while adding a new rule, one will wonder if this newly created rule will break the behavior of some other rule of the ruleset. Pro plan customers can benefit from a great feature of redirection.io to solve this problem: the "Test all the rules" page.
The "impact" step of the rule creation and edition form helps, but it focuses on the currently edited rule, not on its impact on other rules. With the "test all the rules" feature, you can focus on new rules creation and let redirection.io check for you if these new rules are incompatible with previously created rules.
For example, imagine that you have created a couple of rules:

Examples have been attached to these rules, and you have tested that these example requests work as expected:

Imagine that, few time later, you need to create a new rule:

Of course, this ruleset seems naive, and you may be able to catch issues just by looking at the rules, but what if your redirect plan counts thousands of rules?
A new "test all the rules" execution now shows a potential issue, as one of the examples attached to one of the two "old" rules is not working anymore as it was expected when this rule was last edited:

Scroll down, and you will get even more information:

This helps locate past existing rules for which the attached examples will not be handled the same way by redirection.io if the new rule is published. Edit these rules to verify the example behavior, save these rules and you're free all set to publish this new ruleset with confidence!
Rules priorities
As seen in the paragraphs above, rules can sometimes collide. For example, you could create a "catch-all" rule, using a marker, and add a more specific rule for one precise URL included in the "catch-all" rule.
In this case, the rule of thumb is: the rule with the higher priority always wins. This means that the actions defined in the higher priority rule will always override the actions of the same family from lower priority rules.
Ruleset settings
These settings are available if your project uses an agent version at least 2.1.0.
When writing a set of redirection rules for your website, you may want to configure some common behavior for your rules. While we usually follow the Standards and RFC, these might not always perfectly fit business or real-world requirements.
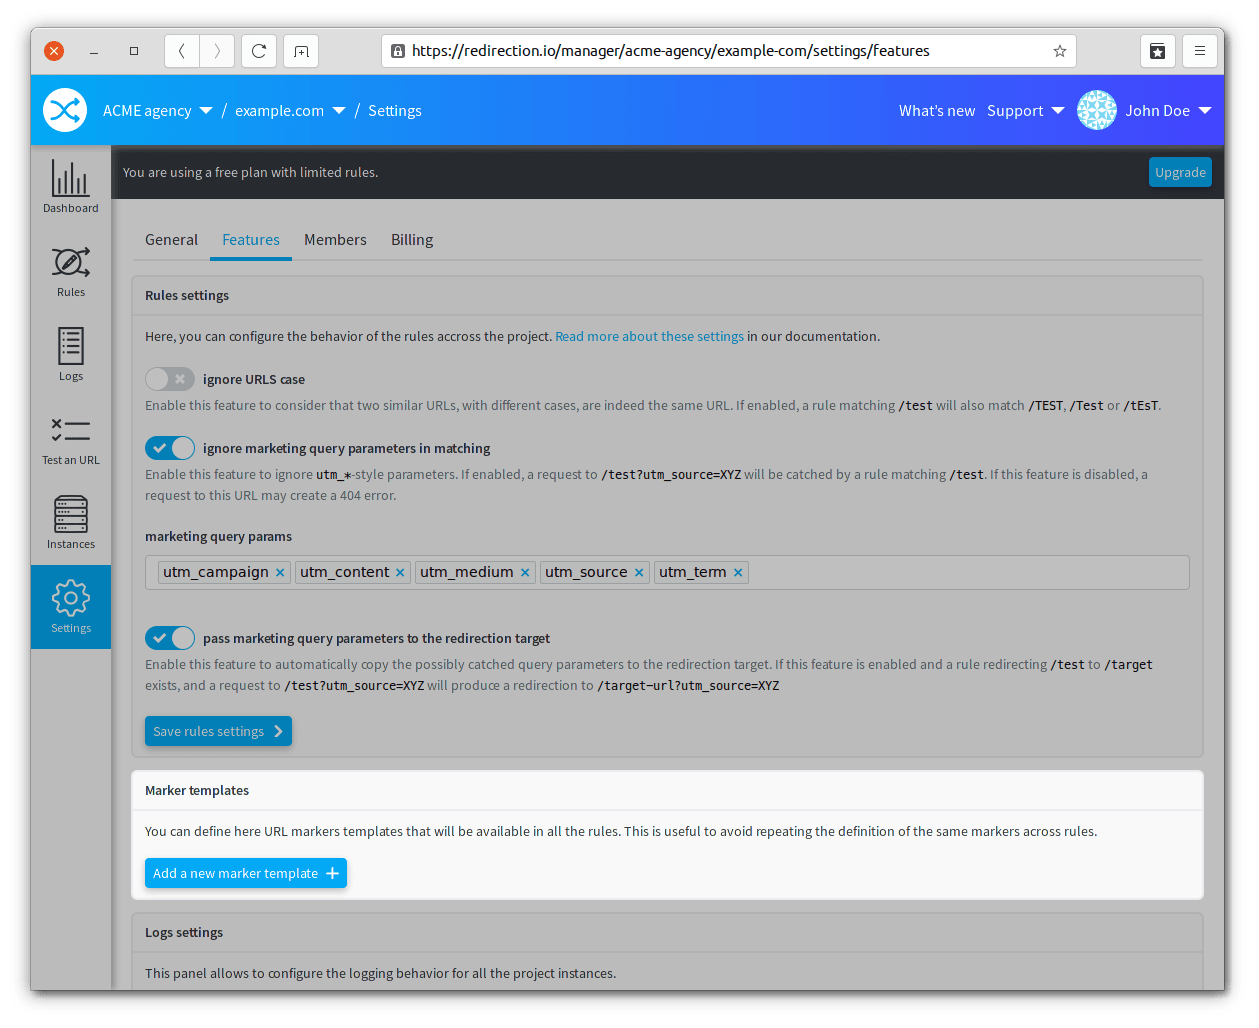
Under the "Settings > Features" menu of a project, you can change the following parameters:

ignore URLS case
The ignore URLS case setting is disabled by default when a project is newly created, and can be changed by project publishers.
If it is disabled, URLs in different cases are considered to be different resources (which follows the standards). This means that, if you create a redirection for the url /test, it will not redirect a request to /TEST.
Enabling this setting changes the behavior, as the redirection agent will ignore the request URL case when matching it against you ruleset. In other words, if this setting is enabled, a redirection rule for the url /test will also redirect a request to /TEST.
ignore marketing query parameters in matching
This setting is enabled by default for all newly created projects, and can be changed by project publishers.
Marketing parameters are URL query parameters that are very commonly used in marketing, to track how online marketing campaigns are effective. There are 5 parameters frequently used:
| Parameter name | Purpose | Required | Example |
|---|---|---|---|
utm_source |
Identify the advertiser, site, publication, etc. that is sending traffic | Yes | utm_source=google |
utm_medium |
Identify the advertising or marketing medium type (email, cpc, banner, etc.) | Yes | utm_medium=cpc |
utm_campaign |
Identify the name of the campaign or the product promotion | Yes | utm_campaign=winter-sale |
utm_term |
Identify the search keywords | No | utm_term=cookbook |
utm_content |
Identify the specific link that was clicked to bring the user to the page | No | utm_content=footer-link |
While these query parameters provide very useful informations for marketing purpose, they produce different URLs, from a strictly technical point of view. In other words, as per the standards, there is no reason to consider that the URLs /test and /test?utm_source=google refer to the same resource. However, the real-life proves that, if you have setup a redirection rule for the url /test, you will usually want that a request to /test?utm_source=google is also redirected.
This is exactly what enabling this setting allows: when enabled, the query parameters will be ignored when trying to find a redirection rule that matches the request. If your marketing campaigns require other query parameters, it is possible to add them in the "marketing query params" field.
pass marketing query parameters to the redirection target
This setting is enabled by default for all newly created projects, and can be changed by project publishers.
When the previous setting is enabled, this setting allows to pass the catched marketing parameters to the redirection target. For example, imagine that your ruleset contains a rule redirecting requests from /test to the target URL /example. With this setting enabled, a request to /test?utm_source=google will get redirected to /example?utm_source=google. If disabled, the redirection will be performed to /example (without the marketing query parameters).
Marker templates
Marker templates are useful to define project-wide markers, that can easily be reused from one rule to another. For example, imagine that you need to define several rules containing a country parameter, which value can be de, es, fr, it, uk or us. It can be a bit repetitive to re-create the same marker in all of these rules.
Marker templates are useful in such a case, as they allow to define markers that can be used in several rules, without the need to re-define it each time.
Setting-up marker templates can be done in a few clicks:
- Hit the "Add a new marker template" button, this opens a form in the lateral panel
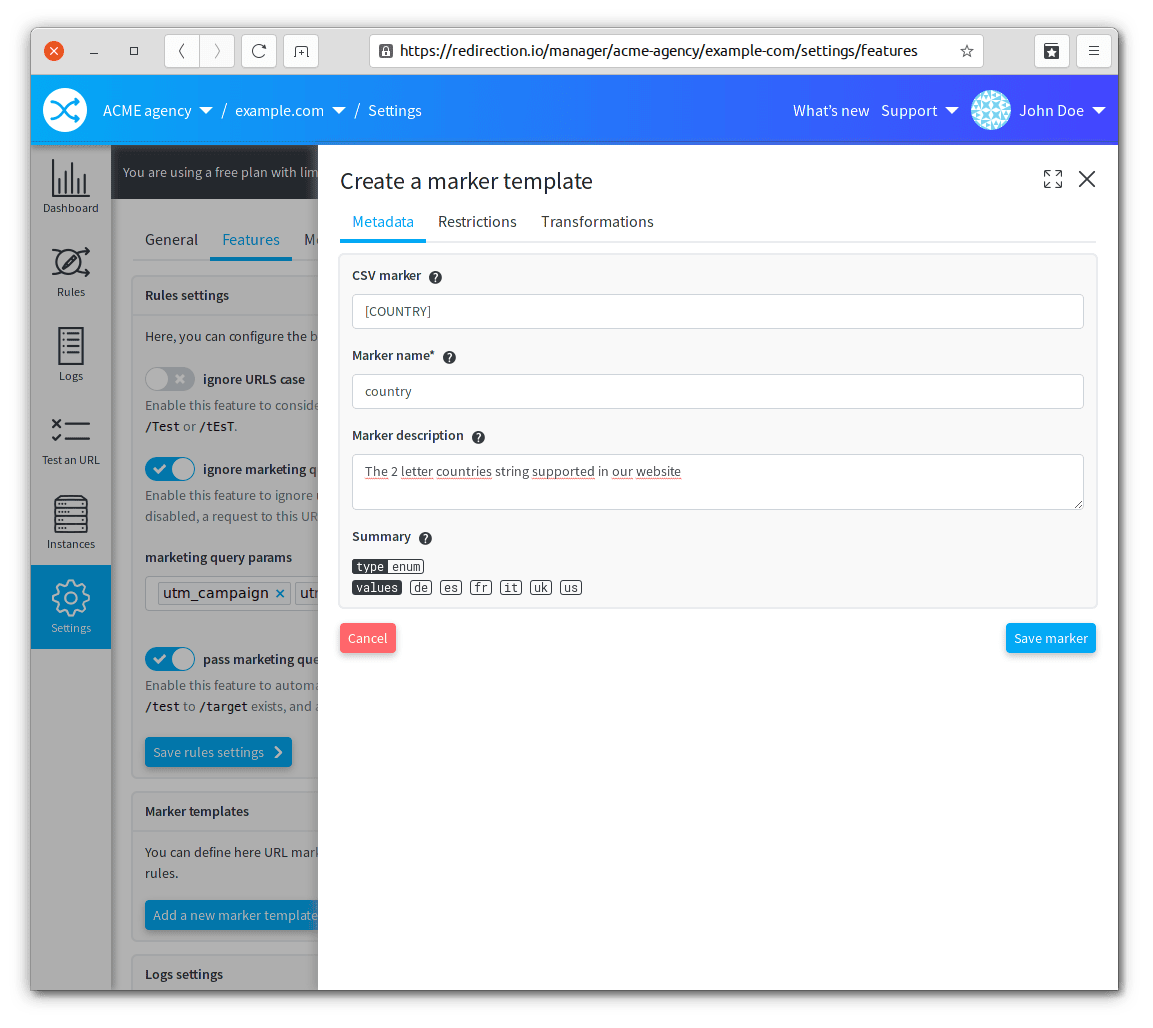
- define a "CSV name: this string will be used when importing rules. Each occurrence of this string will be replaced with a marker of this type;
- the "Marker name" is the unique name for this marker template;
- fill the "restrictions" and "transformations" tabs to define how this marker should behave.


Once a marker template has been defined, you can use it in the rule creation form:

country" marker changes, simply head to the marker template settings and edit the template; you will be proposed to update all the associated rules too.
You may also want to change this marker for one rule only - simply click on the marker name within the rule edition form, and you will be proposed to "unlink" this marker from the marker template:

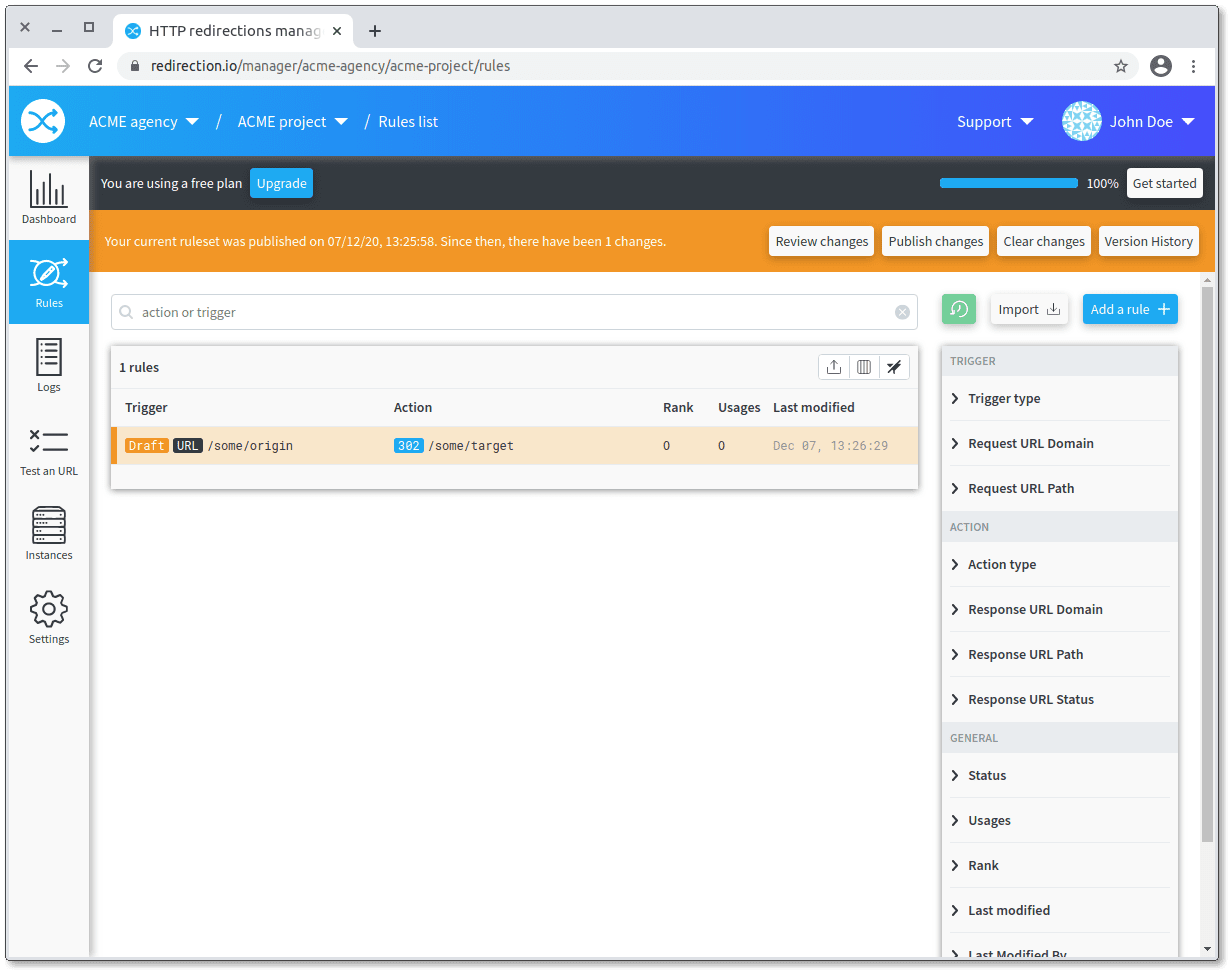
Changes publication and history
Once you have made several changes to your ruleset, you may want to apply these changes on your production instances:
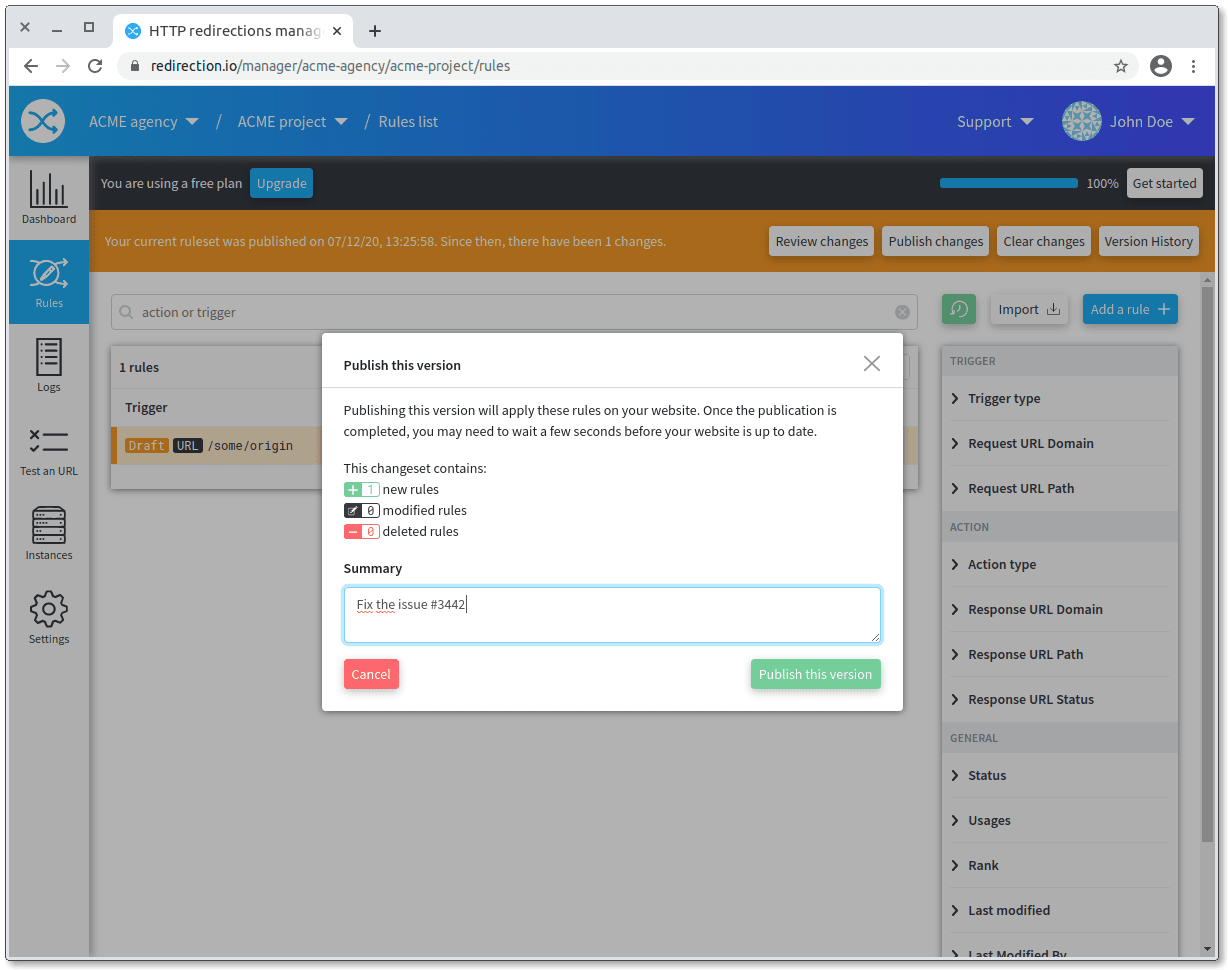
- after a few seconds, depending on your plan, the new rules should be applied to your instances. Head to the project's "instances" screen, you should be able to see which instances are up-to-date.


When are my rules applied ?
Your newly created redirection rules should be applied on your website after a short delay - usually about 20 seconds. You may want to check which agents are up-to-date on your project's "instances" screen, which lists running instances, when they have been updated, and how many rules they are using.