The instructions below have been customized for your project "".
Customize these instructions for the project
Public API
The redirection.io public API offers a way to interact with redirection.io organizations, projects and rules.
Please note that the redirection.io public API is only available in organizations that contain at least one project using a "Starter" or a "Pro" plan.
General considerations
API location and availability
The redirection.io public API is available at https://api.redirection.io: this page provides general information about how to use the API, the available endpoints, etc. It also features an OpenAPI specification that you can use to integrate the API with your own tools: https://api.redirection.io/docs.json.
In the sections below, all the API requests must be sent to the host api.redirection.io with the scheme https.
Security
Using the redirection.io API requires an API key, that can be created under the "API tokens" screen of your organization in the manager:
- Open the redirection.io manager with an organization administrator account
- head to the "Settings > API tokens" screen of your organization
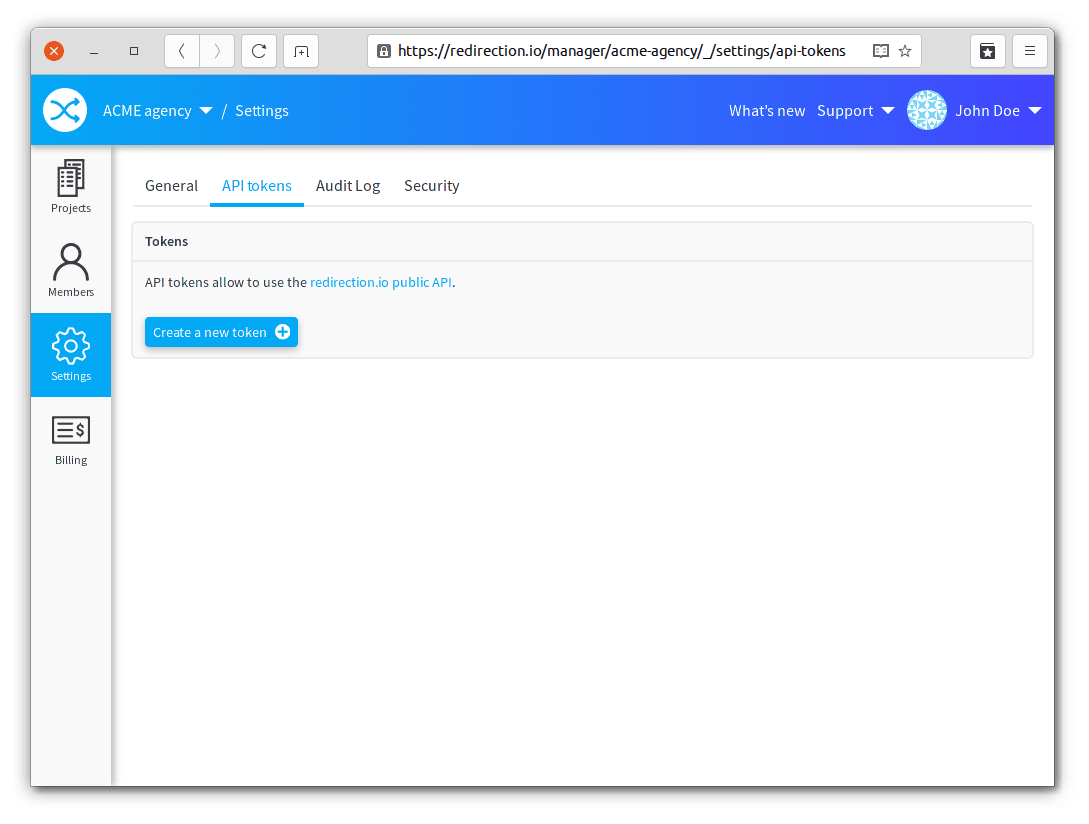
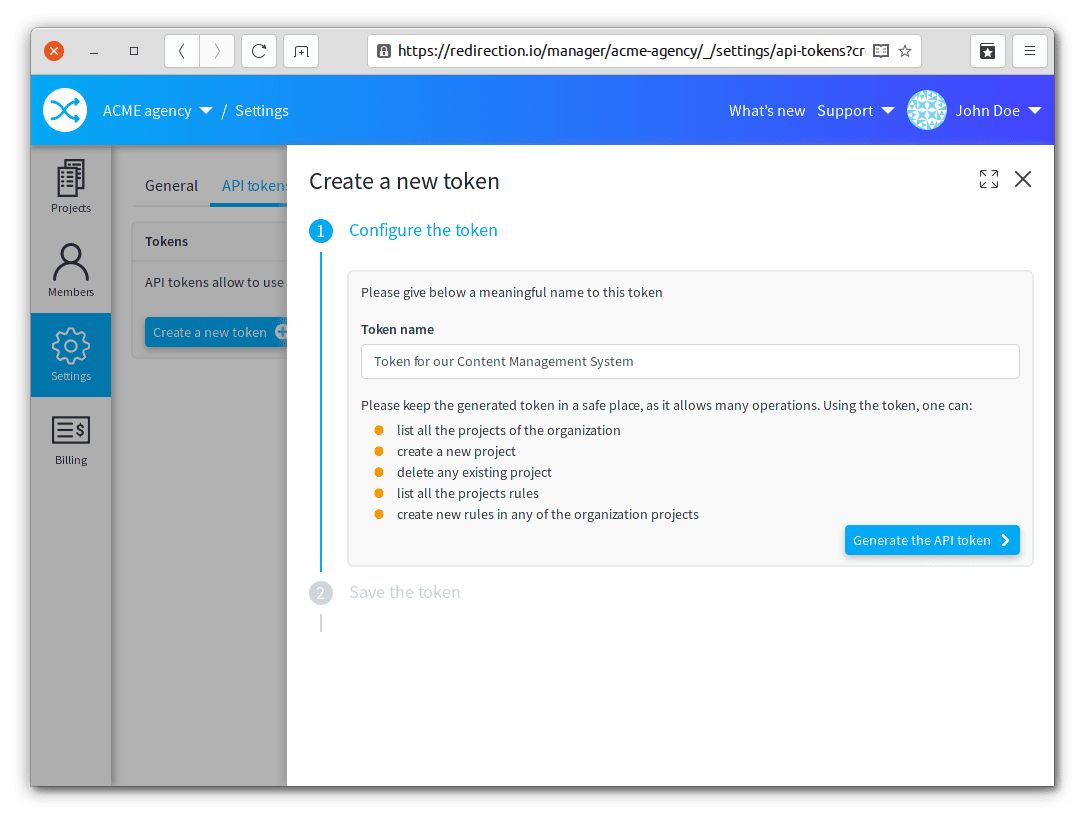
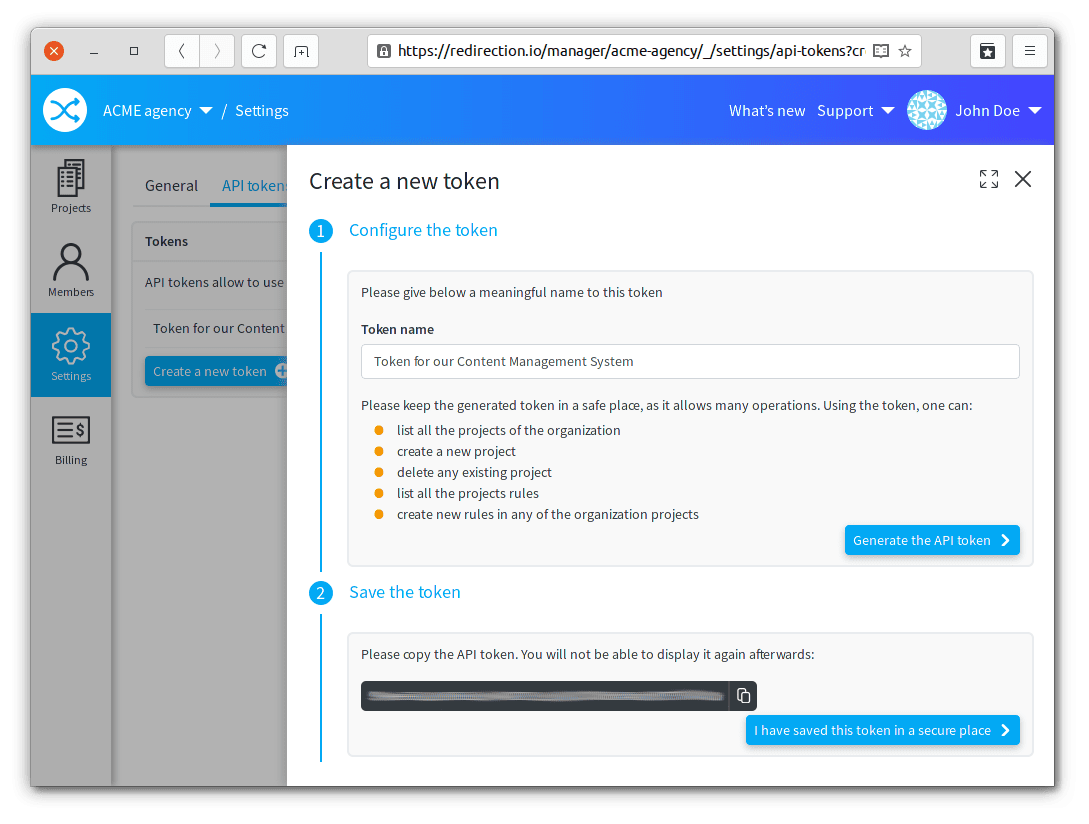
Take care to store this token in a secure location, as it gives a complete control over your redirection.io organization.
Once created, an API token must be used in the Authorization header using the Bearer prefix, as below (of course, replace the string HERE_GOES_THE_TOKEN with the value of the token):
Authorization: Bearer HERE_GOES_THE_TOKENRate limits
The redirection.io public API calls are rate limited. We generally rate limit the requests executed with a given API token to 10 requests per minute.
Additionally, the rules publication endpoint is rate-limited to 20 requests per day. Should you need a higher limit, please contact us to discuss your specific needs.
When a request is rate-limited, we will respond with a 429 Too Many Requests status code, along with a Retry-After response header.
Note also that some of your requests may fail, as your project may be in a state that does not allow certain operations. For example, it is not possible to create new rules or publish rules while a rules import is running in the project.
Whenever this case happens, you will receive a 409 response status code indicating the operations conflict.
Pagination
The API responses are paginated. Each page contain 100 items. Traversing the Rules or Drafts collection can be done using the searchAfterId query string parameter:
curl \
  -XGET https://api.redirection.io/rules?projectId=HERE_GOES_THE_PROJECT_ID&searchAfterId=LAST_ID_OF_PREVIOUS_PAGE \
  -H "Authorization: Bearer HERE_GOES_THE_TOKEN"
The Rules and Drafts collections are sorted by the id if the rules, in order to maintain a consistent sort order during a mass modification of rules across all the pages.
Available endpoints
Details of the organization
The API can be used to retrieve some information about the organization the API token belongs to, with the /organization endpoint:
curl \
  -XGET https://api.redirection.io/organization \
  -H "Authorization: Bearer HERE_GOES_THE_TOKEN"
In return, you will get some basic information about the organization and its projects:
{
   "id" : "859fb30e-5c02-11eb-b66c-fa163e4748ca",
   "name" : "ACME agency",
   "projects" : [
      {
         "id" : "060201ae-88ad-4043-bd02-4661be4fcbd0",
         "metadata" : [],
         "name" : "ACME project",
         "plan" : "starter_1000",
         "slug" : "acme-project"
      }
   ],
   "slug" : "acme-agency"
}
The id of a project is useful to list or create the rules of this project - we will use it in the newt paragraphs.
Listing the rules of a project
In order to get the list of currently published rules, use the /rules endpoint (of course, replace PROJECT_ID with the id of the project whose rules you want to fetch):
curl \
  -XGET "https://api.redirection.io/rules?projectId=PROJECT_ID" \
  -H "Authorization: Bearer HERE_GOES_THE_TOKEN"
The response contains a list of Rule objects:
[
    {
        "id": "20fdf49e-85db-461f-bde9-033974870329",
        "trigger": {
            "source": "/blog/some-source-url",
            "methods": [],
            "requestHeaders": [],
            "responseStatusCodes": [],
            "ipAddress": null,
            "sampling": null
        },
        "actions": [
            {
                "location": "/blog/blog-post-new-url",
                "statusCode": 302,
                "type": "redirection"
            }
        ],
        "markers": [],
        "variables": [],
        "examples": [],
        "priority": 10,
        "description": "This rule redirects an article of the blog to its new URL",
        "metadata": [],
        "enabled": true,
        "tags": [
            "CMS",
            "blog",
            "created with the API"
        ]
    }
]
Searching for a rule baed on its trigger URL
When using the public redirection.io API for automation purposes, for example from your website code to create a new rule when a product's URL changes, you may want to check that there isn't already an existing rule for that URL. To do this, you can use the rule (or draft) search by trigger URL. This will enable you to find out whether a rule already exists for this URL, and if so, to modify or delete it before creating a new one.
This search can be performed using the triggerUrl query string parameter of the /rules (for published rules) and /drafts (for drafts) endpoints. It is important to note that this search will only return rules (or drafts) whose source URL matches exactly the provided URL. For example, if you have a rule with source URL https://www.example.com/old-url, searching with triggerUrl=https://www.example.com/old-url will return this rule, but not if you search with triggerUrl=https://www.example.com/old-url/. It is therefore important to respect the syntax of the URL to obtain the expected results.
Here is an example of a rule search by source URL:
curl \
-XGET "https://api.redirection.io/rules?projectId=PROJECT_ID&triggerUrl=URL_TO_SEARCH" \
-H "Authorization: Bearer HERE_GOES_THE_TOKEN"
In this example, replace /TRIGGER_URL_TO_SEARCH with the source URL you want to search for. If a rule exists for this URL, it will be returned in the response. Otherwise, you'll get an empty list.
Creating a simple redirection rule
The redirection.io API is not meant as a full replacement of the manager, but as a convenient way to create rules programmatically. However, dealing with our complete API can be a bit complex if you have simple requirements.
This the reason why we offer the /redirections endpoint, which is a shortcut to create simple redirection rules, defined as the combination of:
- a source URL (absolute or relative) without any marker
- a redirect status code
- a target location (absolute or relative)
For example, imagine that you just changed the title of a blog post in your website CMS. There are chances, the URL of the article also changed, and you could want to automatically create a redirect rule from the old URL to the new one. The /redirections endpoint allows such a quick rule creation:
curl \
  -XPOST https://api.redirection.io/redirections \
  -H "Authorization: Bearer HERE_GOES_THE_TOKEN" \
  -H "Content-Type: application/json" \
  -d @- <<'EOF'
  {
    "project": "/projects/PROJECT_ID",
    "source": "/blog/some-source-url",
    "target": "/blog/blog-post-new-url",
    "statusCode": 302
  }
EOF
Provided the submitted payload is valid, the response will contain a Draft object, which describes the newly draft created rule:
[
   {
      "id" : "0184097b-82dd-3cf6-1199-e39f730f2cce",
      "status" : "add",
      "rule" : {
         "id" : "12b93f68-32b8-4efb-9484-241c8421bb8a",
         "trigger" : {
            "ipAddress" : null,
            "methods" : [],
            "requestHeaders" : [],
            "responseStatusCodes" : [],
            "sampling" : null,
            "source" : "/blog/some-source-url"
         },
         "actions" : [
            {
               "location" : "/blog/blog-post-new-url",
               "statusCode" : 302,
               "type" : "redirection"
            }
         ],
         "description" : null,
         "enabled" : true,
         "examples" : [],
         "markers" : [],
         "metadata" : [],
         "priority" : 0,
         "tags" : [],
         "variables" : []
      }
   }
]
As you can see, the resulting Draft contains the description of a complete redirection.io rule, along with the draft status (which can be add, update or delete, depending on the operation performed).
If you need to configure more specialized triggers or actions, then rather use the /rules endpoint (described in the next paragraph) for a complete control over rules. As a sidenote, the request payload for the /redirections endpoint supports some optional metadata:
enabled: should the rule be enabled, or not?description: should a description message be attached to the rule?priority: which priority value should be associated to the rule?tags: an optional array of strings to attach to the rules, which can be helpful when searching a specific rule
Here is an example of a complete payload:
{
    "project": "/projects/PROJECT_ID",
    "source": "/blog/some-source-url",
    "target": "/blog/blog-post-new-url",
    "statusCode": 302,
    "enabled": false,
    "description": "This rule redirects an article of the blog to its new URL",
    "priority": 10,
    "tags": ["CMS", "blog", "created with the API"]
}
Once created, the associated rule appears as a "draft" in the rules list in the manager:
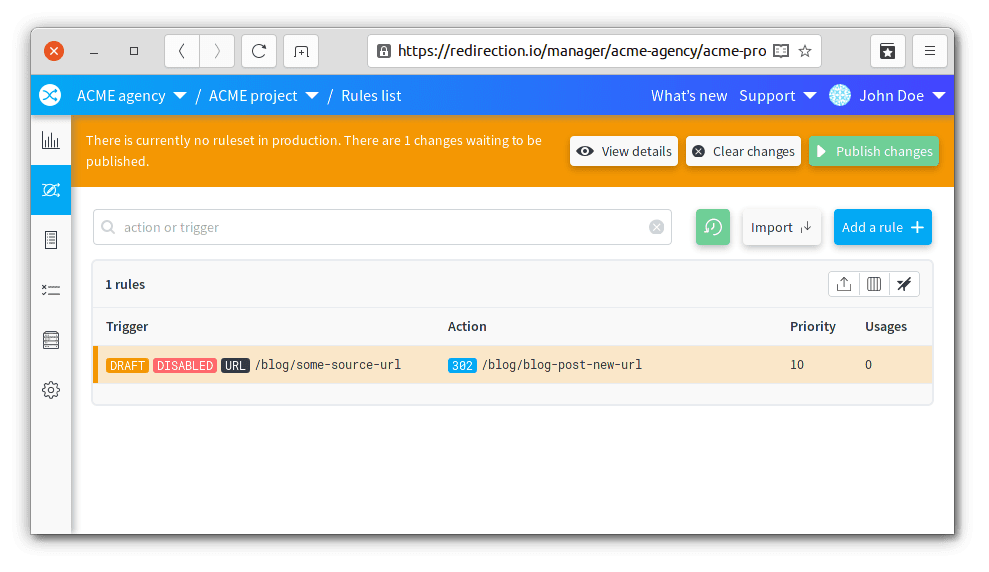
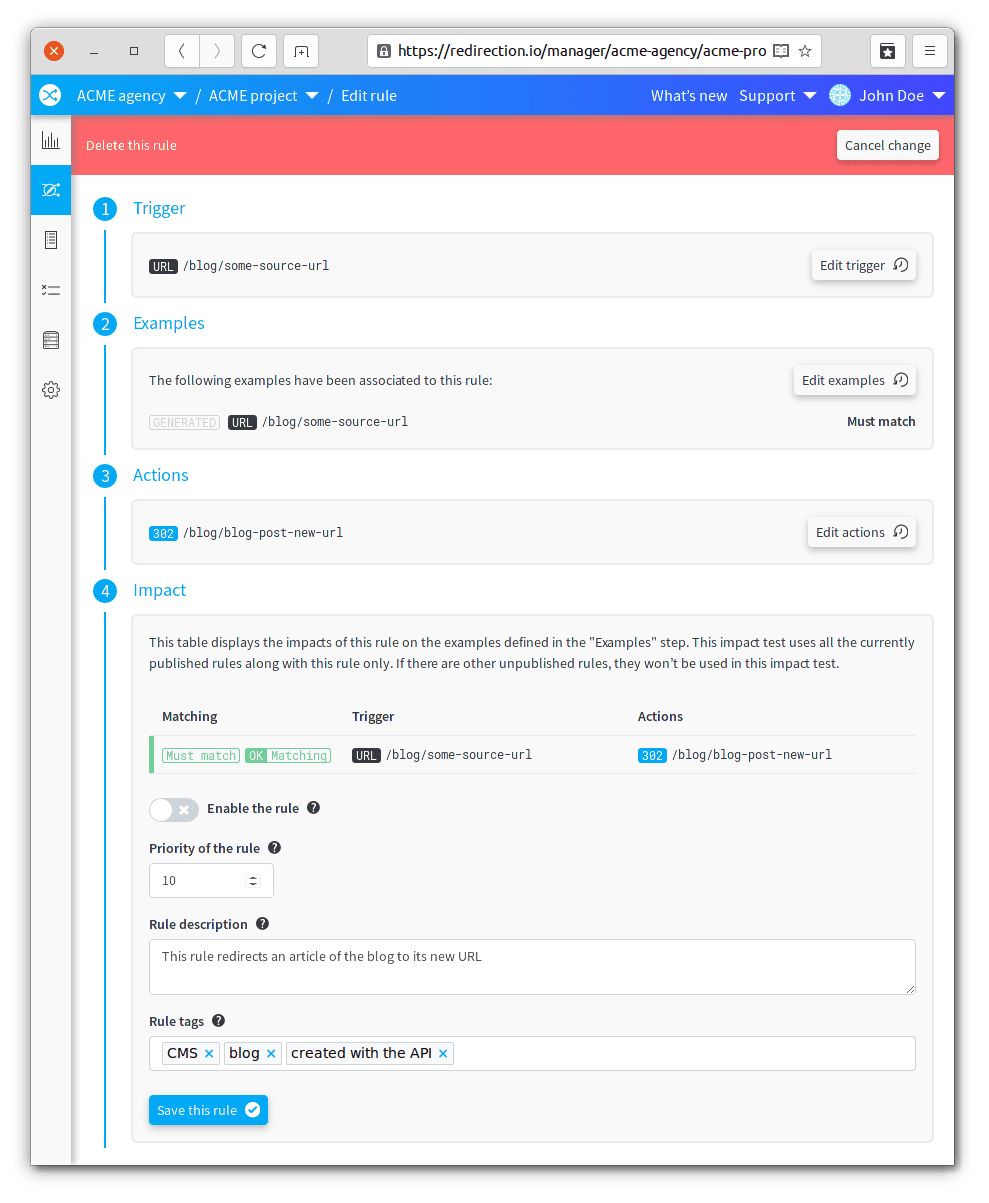
Please note that, when a rule is created, it is not applied to your website unless it is published. Also, it is not listed by the /rules endpoint, as this only lists published rules. However, you can retrieve this rule using the /drafts endpoint:
curl \
  -XGET "https://api.redirection.io/drafts?projectId=PROJECT_ID" \
  -H "Authorization: Bearer HERE_GOES_THE_TOKEN"
This returns the list of the draft changes that are going to be applied when the rules will be published:
[
   {
      "id" : "01840988-96f5-f1df-9841-69af039d6aa6",
      "rule" : {
         "actions" : [
            {
               "location" : "/blog/blog-post-new-url",
               "statusCode" : 302,
               "type" : "redirection"
            }
         ],
         "description" : "This rule redirects an article of the blog to its new URL",
         "enabled" : false,
         "examples" : [],
         "id" : "20fdf49e-85db-461f-bde9-033974870329",
         "markers" : [],
         "metadata" : [],
         "priority" : 10,
         "tags" : [
            "CMS",
            "blog",
            "created with the API"
         ],
         "trigger" : {
            "ipAddress" : null,
            "methods" : [],
            "requestHeaders" : [],
            "responseStatusCodes" : [],
            "sampling" : null,
            "source" : "/blog/some-source-url"
         },
         "variables" : []
      },
      "status" : "add"
   }
]
Creating more complex traffic rules
The redirection.io public API also offers a full control over the trigger and actions. In many scenarios, you will want to create programmatically complex rules. All the redirection.io triggers and actions are available in the public API, as described in the Rule model.
Create markers using the API
Here is a simple example on how to create a marker variable in a rule:
curl \
    -XPOST https://api.redirection.io/rules \
    -H "Authorization: Bearer HERE_GOES_THE_TOKEN" \
    -H "Content-Type: application/json" \
    -d @- <<'EOF'
    {
        "project": "/projects/PROJECT_ID",
        "trigger": {
            "source": "/animals/@everything"
	    },
	    "actions": [
	        {
	            "type": "redirection",
	            "location": "https://example.com/pets/@everything",
	            "statusCode": 307
	        }
	    ],
	    "markers": [
	        {
	            "name": "everything",
	            "type": "anything"
	        }
	    ],
	    "variables": [
	        {
	            "type": "marker",
	            "name": "everything",
	            "marker": "everything"
	        }
	    ],
	    "examples": [
	        {
	            "mustMatch": true,
	            "url": "https://example.com/animals/fish"
	        },
	        {
	            "mustMatch": false,
	            "url": "https://example.com/not-matching/fish"
	        }
	    ],
	    "description": "A redirect rule with a marker",
	    "enabled": true,
	    "tags": [
	        "api created rule"
	    ]
	}
EOF
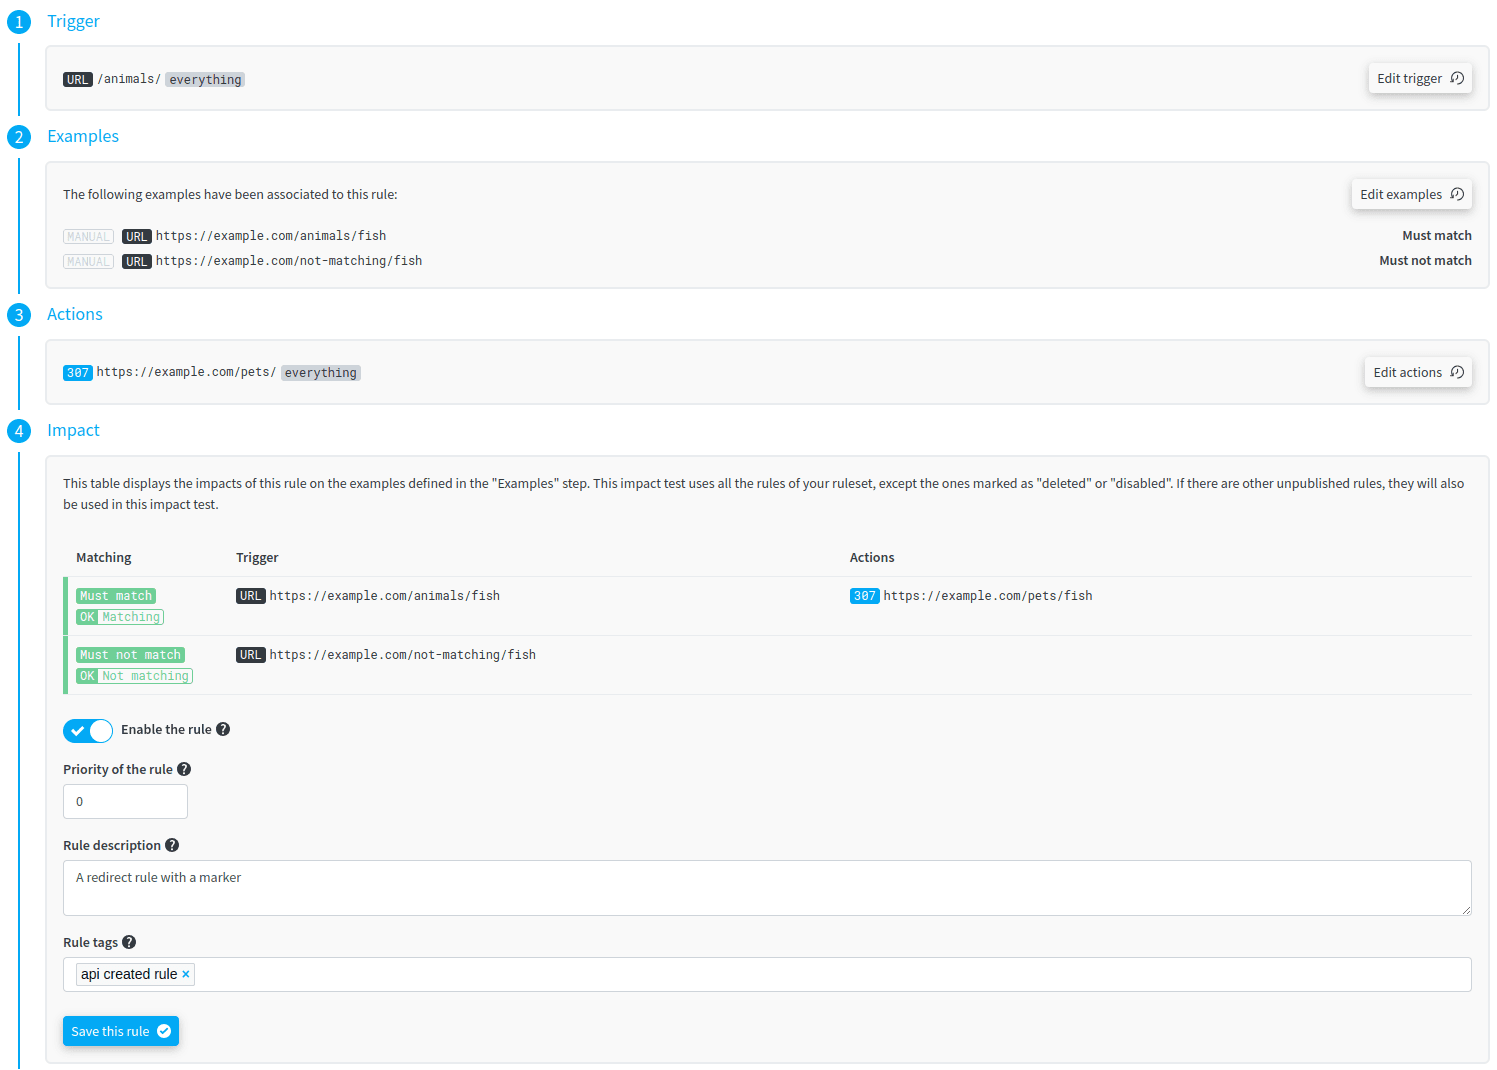
This will result in the following draft rule being created:
Complete example
Here is an example of a (quite complete) rule creation call:
curl \
    -XPOST https://api.redirection.io/rules \
    -H "Authorization: Bearer HERE_GOES_THE_TOKEN" \
    -H "Content-Type: application/json" \
    -d @- <<'EOF'
    {
        "project": "/projects/PROJECT_ID",
        "trigger": {
            "source": "/animals/@animalName",
            "methods": [
                "GET",
                "POST"
            ],
            "requestHeaders": [
                {
                    "name": "User-Agent",
                    "operator": "contains",
                    "value": "bot"
                }
            ],
            "responseStatusCodes": [
                418
            ],
            "ipAddress": {
                "type": "inRange",
                "start": "1.2.3.4",
                "end": "1.2.3.255"
            },
            "sampling": 23
        },
        "actions": [
            {
                "type": "customHtml",
                "value": "<!-- Hello -->",
                "location": "headStart"
            },
            {
                "type": "redirection",
                "location": "https://example.com/pets/@animal",
                "statusCode": 307
            },
            {
                "type": "header",
                "name": "X-Redirectionio-Method",
                "value": "The method for this request was: @httpMethod",
                "mode": "override"
            }
        ],
        "markers": [
            {
                "name": "animalName",
                "type": "enum",
                "values": [
                    "dog",
                    "cat",
                    "fish"
                ],
                "transformers": [
                    {
                        "type": "uppercase"
                    }
                ]
            }
        ],
        "variables": [
            {
                "type": "marker",
                "name": "animal",
                "marker": "animalName"
            },
            {
                "type": "requestMethod",
                "name": "httpMethod",
                "transformers": [
                    {
                        "type": "lowercase"
                    }
                ]
            }
        ],
        "examples": [
            {
                "mustMatch": true,
                "url": "https://example.com/animals/fish",
                "method": "GET",
                "responseStatusCode": 418,
                "headers": [
                    {
                        "name": "User-Agent",
                        "value": "example-bot/1.0"
                    }
                ],
                "ipAddress": "1.2.3.10"
            },
            {
                "mustMatch": true,
                "url": "https://example.com/animals/dog",
                "method": "POST",
                "responseStatusCode": 418,
                "headers": [
                    {
                        "name": "User-Agent",
                        "value": "generic-bot"
                    }
                ],
                "ipAddress": "1.2.3.118"
            },
            {
                "mustMatch": false,
                "url": "https://example.com/animals/cat",
                "method": "DELETE"
            }
        ],
        "description": "Some quite complete rule example",
        "enabled": true,
        "tags": [
            "animals",
            "api created rule"
        ]
    }
EOF
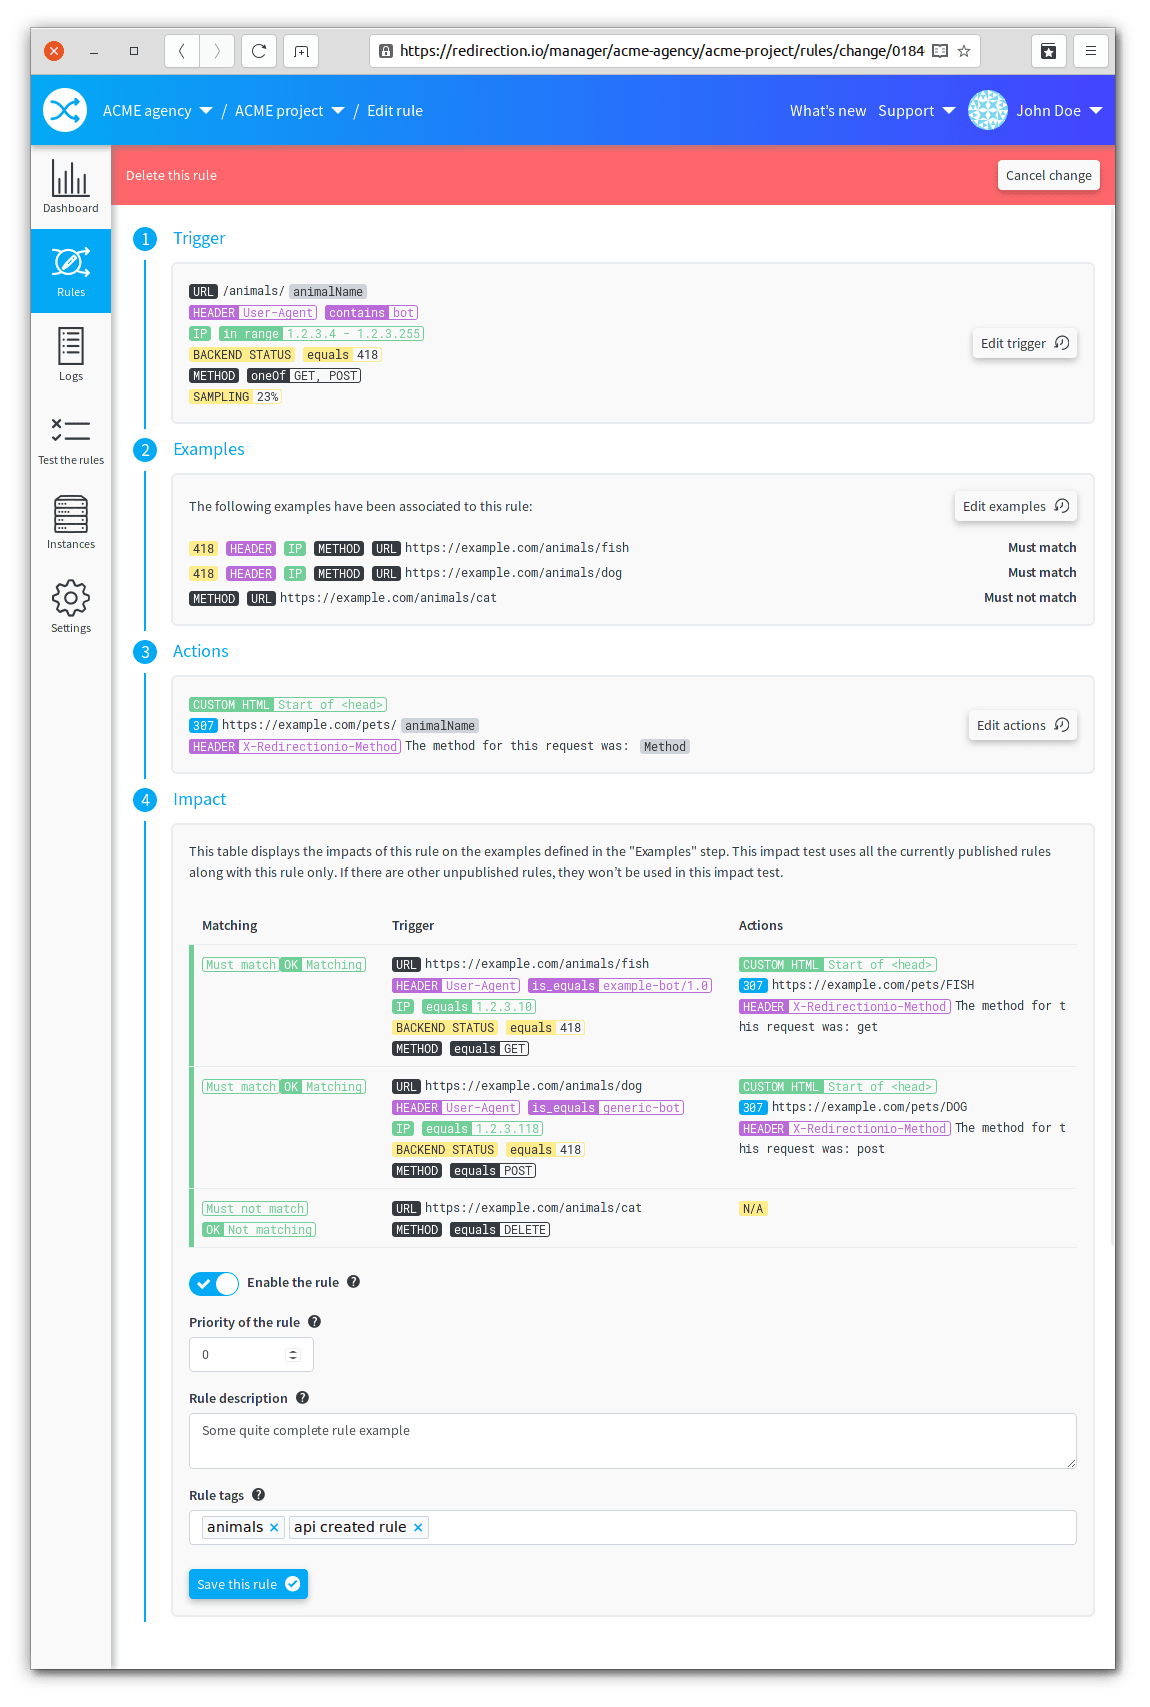
This will result in the following draft rule being created:
Publishing rules
Once a rule is created, modified or deleted using the public API, it is listed as a "draft" change in your ruleset. This means that, unless you publish the rules:
- the rule is not applied on your production website;
- the changes are not listed in the
/rulesendpoint; - the changes only appear in the
/draftsendpoint.
You can publish rules using the graphical interface, or using the API:
curl \
  -XPOST https://api.redirection.io/projects/PROJECT_ID/publish \
  -H "Authorization: Bearer HERE_GOES_THE_TOKEN"
This call triggers the publication of all the changes performed in the ruleset, which will be shortly made available to your live website!
Usage and advices
The redirection.io public API is pretty straightforward to use and proves useful when integrating redirections management in your Content Management System. However, there are a few tips to know, to avoid common pitfalls.
Automatic rules creation
You may want to create a new redirect rule when the URL of a page or a product changes on your website. Ecommerce sites, particularly in the fashion sector, may want to move a product page from the current collection to an archive section, in another category of the site or sometimes even under another sub-domain.
When doing so, you must beware not to break your redirect plan by adding new rules that would create redirection chains or, worse, loops.
Avoiding redirection chains
The the /redirections endpoint allows to create new redirection.io rules.
For example, imagine that the product located at https://example.com/current/1234-some-product needs to be moved to https://example.com/archive/1234-some-product. In your CMS, you would change the URL of the product, and you would use the redirection.io API to create new rule for the associated redirect.
Then, when after a couple of months, when the product URL changes again, for example to https://example.com/retired-products/1234-some-product, you will need to create a new rule, for redirecting from /archive/1234-some-product to /retired-products/1234-some-product. When doing so, there will be a redirects chain: a request to /current/1234-some-product will first be redirected to /archive/1234-some-product which will itself be redirected to /retired-products/1234-some-product. While redirect chains are not a big matter, they can consume some crawl budget, which is always something one would prefer to avoid.
Hence, you could edit the first redirection rule to directly redirect the /current/1234-some-product path to /retired-products/1234-some-product. Provided you have stored the rule ID that was given in the response to the first rule creation call, you can edit this rule directly using the updateRule endpoint:
curl \
    -XPUT https://api.redirection.io/rules/RULE_ID \
    -H "Authorization: Bearer HERE_GOES_THE_TOKEN" \
    -H "Content-Type: application/json" \
    -d @- <<'EOF'
    {
        "project": "/projects/PROJECT_ID",
        "trigger": {
            ...
        },
        "actions": [
            ...
        ],
        "markers": [
            ...
        ],
        "variables": [
            ...
        ],
        "examples": [
            ...
        ],
        "description": "Some new description",
        "enabled": true,
        "tags": [
            ...
        ]
    }
EOF
Therefore, it can be a good idea to store, in your CMS or your eCommerce platform, the rule id that is associated with a given page or product, so you can retrieve it afterwards and either delete it (if the redirect is not required anymore) or edit it (if the redirect needs to be changed).
Avoiding redirection loops
Our knowledge-base doc page about "What is a URL redirect? already explains in detail why you should avoid redirect loops.

When creating new rules using the redirection.io manager, examples are attached to your rules, and the "Impact" step allows to detect potential issues with the newly created rule.
When using the public API, such impact verification is not possible, as there's no user-interactivity. In other words, redirection.io stores new API-created rules blindly, and completely relies on your own verifications to assume their validity.
Avoiding redirect loops can be challenging in this context - a good approach can be to make sure that there's no rule that redirects the target of the rule that you are about to create. In other words, with the above schema, if you are about to create the redirect /d --> /a, then first check that there's no rule using /a as its source URL.
If you create automatic rules associated with a specific article or product of your CMS or eCommerce website, it is a good idea to store in your backend the id of the redirection.io rule(s) that have been created for this product.
Let's use again the above example of a product initially located at https://example.com/current/1234-some-product that needs to be moved to https://example.com/archive/1234-some-product (1). In your CMS, you would change the URL of the product, and you would use the redirection.io API to create new rule for the associated redirect. Then, when after a couple of months, the product URL needs to be changed back to the initial URL, https://example.com/current/1234-some-product (2).
During (1), you would create a first redirect rule. Before creating another rule during (2), you must of course remove the rule created during (1). In other words, when the product is moved in your CMS, you must perform several API calls:
- if a rule is already associated with this product, remove the rule using the deleteRule endpoint
- then, create the new rule
- publish the changes