The instructions below have been customized for your project "".
Customize these instructions for the project
nginx module
We provide a nginx module, which exposes redirection.io right in your nginx configuration. Using this module is one of the advised ways of integrating redirection.io in your infrastructure.
We also provide an Apache module for Apache users.
As an alternative to the deloyment using the "reverse proxy" mode, the redirection.io nginx module is a quick way to integrate redirection.io in your existing infrastructure. This dynamic module just hooks in the nginx request and response loop, and synchronously queries a tcp API of the locally installed agent whenever a request arrives. When an incoming HTTP(s) request arrives, it is handled by the nginx webserver, which redirection.io's native module hooks in, in a very fast and performant way:
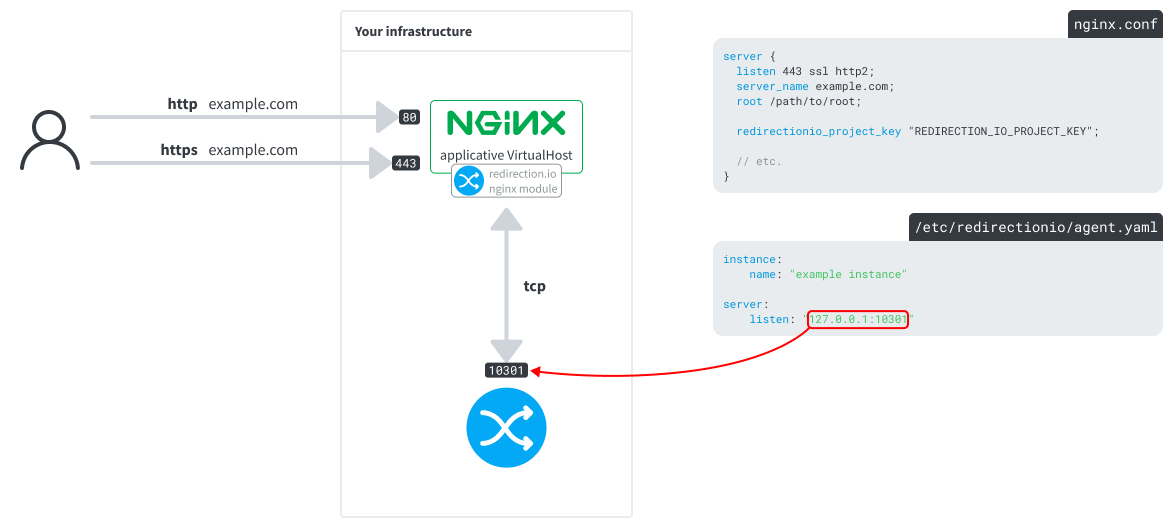
Please note that the nginx module requires a redirection.io agent instance to be available on your infrastructure, so please also setup the redirection.io agent.
Installing the module
Debian and APT-based distributions
If you use a Debian or APT-based Linux distribution and want to install libnginx-mod-redirectionio, please use the following commands:
-
Select your distribution
In the next steps, please use the right values, depending on your distribution version:- Debian 13 (Trixie)
- repository source url:
trixie main - Debian 12 (Bookworm)
- repository source url:
bookworm main - Debian 11 (Bullseye)
- repository source url:
bullseye main - Ubuntu 24.04 LTS (Noble Numbat)
- repository source url:
noble main - Ubuntu 22.04 LTS (Jammy Jellyfish)
- repository source url:
jammy main
-
Install the
apt-transport-httpspackage:sudo apt-get install apt-transport-https -
Import our apt repository key:
sudo mkdir -p /etc/apt/keyrings wget -qO- https://packages.redirection.io/gpg.key | sudo tee /etc/apt/keyrings/redirectionio-archive-keyring.asc -
Add our Debian url:
echo "deb [arch=$(dpkg --print-architecture) signed-by=/etc/apt/keyrings/redirectionio-archive-keyring.asc] https://packages.redirection.io/deb/stable/3 trixie main" | sudo tee -a /etc/apt/sources.list.d/packages_redirection_io_deb.list > /dev/null -
Update the apt cache and install redirection.io's nginx module:
sudo apt update && sudo apt install libnginx-mod-redirectionio -
Once the module is installed, restart the nginx service, for instance:
sudo systemctl restart nginx
You're done! redirection.io is installed, up and running. You can go on with redirection.io's nginx configuration and should see some logs within minutes 🎉
Red Hat and RPM-based distributions
Our nginx module is available for Centos 7, Centos 8, RHEL 7, RHEL 8 up to the release 2.8.0. From the release 2.9.0 and later, only Centos 9 stream is supported. However, you may still compile the redirection.io nginx module for your distribution
If you use a Red Hat/CentOS-like Linux distribution and want to install libnginx-mod-redirectionio, please use the following commands:
-
Import the signature key:
sudo rpm --import https://packages.redirection.io/gpg.key -
Add our RPM repository:
sudo yum-config-manager --add-repo https://packages.redirection.io/rpm/stable/3/centos_9 -
Install redirection.io's nginx module:
sudo yum install libnginx-mod-redirectionio -
Once the module is installed, restart the nginx service, for instance:
sudo systemctl restart nginx
You're done! redirection.io is installed, up and running. You can go on with redirection.io's nginx configuration and should see some logs within minutes 🎉
Ansible role
A redirectionio.nginx_module Ansible role is available. You may install it using Ansible Galaxy:
ansible-galaxy install redirectionio.nginx_module
Basically, this role installs the redirection.io nginx module and makes sure you use the right repository locations, depending on your host operating system. It supports Debian and RHEL-based Linux distributions.
Configuration
Enabling the redirection.io is as simple as declaring the project key in the Virtualhost or configuration node where you want to enable redirection.io.
You can find the project key in the "instances" screen of the manager (click on the "Setup on your website" > "Setup on your infrastructure" button).
For instance, this can be in you main server directive:
http {
    ...
    redirectionio_project_key SOME_PROJECT_KEY_HERE;
    ...
}
Or in a Virtualhost:
server {
    server_name example.org;
    root /path/to/root;

    ...
    redirectionio_project_key SOME_PROJECT_KEY_HERE;
    ...
}
Or even in a location block:
server {
    server_name example.org;
    root /path/to/root;

    ...

    location /some-path/ {
        redirectionio_project_key SOME_PROJECT_KEY_HERE;
    }

    ...
}
The redirectionio_project_key can either be double-quoted or not (eg., SOME_PROJECT_KEY_HERE or "SOME_PROJECT_KEY_HERE").
Module configuration directives
The libnginx-mod-redirectionio enables several configuration directives, which can be used wherever the redirectionio_project_keyis used:
redirectionio
- Syntax:
redirectionioon | off; - Default:
redirectionio off; - Context:
http, server, server if, location, location if
This directive enables or disables redirection.io for requests matching the current context. By default, redirection.io is disabled, but is automatically enabled when the directive redirectionio_project_key is set in a node of the configuration.
Using redirectionio off can hence be useful to disable redirection.io in a particular location:
server {
    server_name example.org;
    root /path/to/root;
    redirectionio_project_key SOME_PROJECT_KEY_HERE;

    ...

    location /some-path/ {
        redirectionio off;
    }

    ...
}
redirectionio_project_key
- Syntax:
redirectionio_project_keysome_key; - Default:
none - Context:
http, server, server if, location, location if
Sets the redirection.io project key to use for requests matching the current context. When set, this directive automatically turns the redirectionio directive on.
redirectionio_logs
- Syntax:
redirectionio_logson | off; - Default:
redirectionio_logs on; - Context:
http, server, server if, location, location if
This directive enables or disables logs collection for the current matching context (however, please note that logs will only be sent if both the redirectionio directive and redirectionio_logs are set to on. In other terms, setting redirectionio_logs to on with redirectionio set to off won't collect any logs).
redirectionio_pass
- Syntax:
redirectionio_passip:port | unix:///path; - Default:
redirectionio_pass 127.0.0.1:10301; - Context:
http, server, server if, location, location if
This directive specifies the location of the redirectionio-agent that the nginx module must use for matching requests. In a traditional setup, the agent is only available at 127.0.0.1:10301. If you expose the agent through a file, then the value of the redirectionio_pass directive can, for instance, be of the form unix:///var/run/redirectionio.sock.
This directive also allows to set some connection pool management options:
redirectionio_pass 127.0.0.1:10301 min_conns=0 keep_conns=10 max_conns=10 timeout=100;
All the settings min_conns, keep_conns, max_conns and timeout are optional:
min_conns(default0): this is the minimal number of tcp connections that are permanently established between the nginx module and the redirection.io agent. If these connections do not exist, they are created, even if no HTTP request is handled by the nginx server.max_conns(default10): this is the maximal number of tcp connections that can be established between the nginx module and the redirection.io agent at a given time. If all the connections are currently in used, the module will wait for thetimeoutduration, then log an error and let the request pass without handling it.keep_conns(default10): this is the minimal number of tcp connections to be kept alive once they have been created.timeout(default100): this is the duration, in milliseconds, while the nginx module will wait for a response from the agent. The redirection.io agent is very performant and, even with hundreds of thousands of rules, should always send a response much faster than this timeout value (usually in less than 1ms), but this setting ensures that, even in very hard load contexts, the agent call will not block the request for too long.
For example, with min_conns=1 keep_conns=10 max_conns=100 timeout=50:
1connection is established between nginx and the agent when nginx is started;- nginx will create up to
100connections to the agent (of course, it reuses available connections); - if many connections were created and are no more useful, they will be released, but nginx will keep
10connections alive; - nginx will wait max. for
50milliseconds for a response from the redirection.io agent.
redirectionio_scheme
- Syntax:
redirectionio_schemehttp | https; - Default:
none - Context:
http, server, server if, location, location if
This directive allows to force the scheme to use when matching the request. This is useful if you have defined rules using a URL trigger with an absolute URL value (containing a scheme, a domain name, etc.), but you want to use the same rules in a VirtualHost with another scheme.
Imagine, for example, a VirtualHost listening https traffic only, using a project in which rules are defined using the http:// scheme: URLs would never be matched, as no rule uses the https:// scheme. In this case, setting the redirectionio_scheme value to http will force the module to match with this scheme, not the real request scheme.
redirectionio_host
- Syntax:
redirectionio_hostsome-host; - Default:
none - Context:
http, server, server if, location, location if
This directive allows to force the host to use when matching the request. This is useful if you have defined rules using URL triggers with absolute URL values (containing a scheme, a domain name, etc.), and your VirtualHost uses another hostname.
redirectionio_add_rule_ids_header
- Syntax:
redirectionio_add_rule_ids_headeron | off; - Default:
redirectionio_add_rule_ids_header off; - Context:
http, server, server if, location, location if
If this setting is enabled, a response header named X-RedirectionIo-RuleIds will be added to the response. Its value will contain the list of the redirection.io rule ids applied to this response, separated by the ; character.
redirectionio_set_header
- Syntax:
redirectionio_set_headerX-Custom-Header-Name HeaderValue; - Default:
none - Context:
http, server, server if, location, location if
This directive allows to pass the request to the redirection.io module by adding a request header filled with a given value. The value passed to the header can be a nginx variable, eg.:
redirectionio_set_header X-GeoIP-Country-Code $geoip_data_country_code;
This can be useful to pass variables from the nginx context to the redirection.io agent, that can be used in redirection rules using the request header trigger.
redirectionio_trusted_proxies
- Syntax:
redirectionio_trusted_proxies127.0.0.1,172.18.0.0/24; - Default:
none - Context:
http, server, server if, location, location if
This directive is used by the module to restrict which proxies are trusted before evaluating the X-Forwarded-* headers. This is in particular useful when using the IP Address trigger, in order to ensure that the evaluated IP address is valid and has not been forged.
The value to use for this directive is a comma-separated list of all the proxies IP addresses that should be trusted (it might be a CIDR notation for subnetworks).
The nginx module is opensource and available on our github account.
Questions and answers & troubleshooting
Are there any drawbacks to using the nginx module instead of the "reverse proxy" mode?
While this approach is interesting - because it means few changes to the infrastructure layout and the requests flow in your stack - it can be sometimes challenging to setup:
- first, nginx dynamic modules are tied to very specific versions of nginx. We distribute pre-compiled modules for officially distribution-provided versions of nginx, but we cannot distribute a nginx module for each and every version of nginx available. In other words, the users of custom nginx installs will have to compile the nginx module themselves
- the nginx request management flow is not a quiet journey 🙂 In other words, depending on which modules are installed, unexpected behaviors may appear, and there is no way to guarantee that our module will perfectly integrate in your nginx install. For example, there might be incompatibilities with other modules
- nginx dynamic modules are developed using the C language, which does not guarantee memory-safety. The redirection.io agent itself, and the opensource libredirectionio underlying library, are Rust-based binaries
- updating a dynamic module requires a restart of the server, which is not always something that you want to do
- last and not least, using the redirection.io nginx module means that, for each and every request, a synchronous TCP call is performed from the nginx process to the redirection.io agent. We offer several tweaking directives to maintain a connection pool, and it will perfectly work on reasonnable traffic websites, but it can become a bit challenging to properly configure in highly demanding environments
This is why we usually recommend to rather use the reverse proxy mode. However, the nginx module is a perfectly convenient, supported, and fully tested way to use redirection.io if you wish so.
The module cannot be loaded
We distribute our nginx module for many distributions, which should cover most of the production cases. However, there is one limitation: the packages that we propose will only work with the default nginx version provided by the distribution. To load a nginx module, it must be binary compatible with the version of nginx installed.
If you try to load the redirection.io nginx module with an incompatible version of nginx, you should get error messages such as:
nginx: [emerg] module "/usr/share/nginx/modules/ngx_http_redirectionio_module.so" version 1018000 instead of 1024000 in /etc/nginx/modules-enabled/50-mod-http-redirectionio.conf:1
So, if you installed a more recent version of nginx - either by compiling it yourself, or by using a third-party packages repository (for example the nginx packages repository) - then the module that we provide in our own packages repository is not binary-compatible with the version of nginx that you are using.
In this case, you will have to compile the redirection.io nginx module yourself, as described in the chapter "Using the nginx module with a non-standard nginx install" below.
If you are fluent with Docker, this compilation process is also available as a Dockerfile on our Github account.
The nginx reload / restart command does not work and errors unknown directive "redirectionio_project_key"
If nginx fails to reload and complains about an unknown directive redirectionio_project_key, this may indicate that the nginx module has not been correctly loaded in nginx.
Please check that your main nginx configuration file (usually /etc/nginx/nginx.conf) contains a line to include enabled nginx modules (eg. include /etc/nginx/modules-enabled/*.conf;). If this line is missing, you may force loading the module by adding the following line in /etc/nginx/nginx.conf:
load_module modules/ngx_http_redirectionio_module.so;
Then, restart nginx (again), and it should be fine.
The module redirects to a wrong domain, or to a wrong port
In some production setups, the nginx server is not the first node of the infrastructure - there can be a Varnish, an Envoy proxy, a front nginx configured as a reverse proxy, etc.
By default, nginx will generate a redirection Location with the domain name and port number it received the request with. This means that, if the redirection.io nginx module runs in a nginx server listening in http (not https) on the domain internal on port 8080, the redirections Location header will be of the form Location: http://internal:8080, which is obviously not what you want.
In those cases, you may add the absolute_redirect off; directive in the VirtualHost where the redirection.io module is enabled:
server {
    listen 8080;
    server_name internal;
    root /path/to/root;

    absolute_redirect off;

    ...
    redirectionio_project_key SOME_PROJECT_KEY_HERE;
    ...
}
This will prevent nginx to rewrite/set the scheme, host and port in redirection targets using relative locations. This won't affect the redirection rules that you created to other external domains.
Dynamically choose the project key to use
You may need to manage several websites under the same nginx VirtualHost, while still wanting to keep separate redirection.io projects (for organizational reasons, to delegate the permissions to the right teams, etc.)
In this case, a first solution can be to use a nginx variable to dynamically define the redirection.io project key to use.
In the http section of the nginx configuration, define the $project_key variable:
http {
    ...

	map $http_host $project_key {
		default 'KEY TO BE USED BY DEFAULT';
		'example.com' 'KEY FOR THE example.com PROJECT';
		'second-domain.com' 'KEY FOR THE SECOND PROJECT';
		'fr.example.com' 'KEY FOR THE fr.example.com SUB-DOMAIN PROJECT';
	}
}
And, in the VirtualHost, use this variable:
server {
	listen 80 default_server;
	listen [::]:80 default_server;
	server_name _;
    root /path/to/root;

    ...

    redirectionio_project_key $project_key;
}
This setup allows to:
- map redirection.io projects to specific domains
- define a default redirection.io project to be used for all domains which are not overriden.
In other project configurations, you will still want to use several redirection.io projects, for permissions purpose, without the possibility to segment based on the domain name. It is the case, for example, if your website uses paths for geographical regions (/uk/, us, fr, etc.) and if you want to restrict the access of contributors to one region only.
In this case, using the $http_host nginx variable will not be convenient, and you will have to use the nginx location block:
server {
	listen 80 default_server;
	listen [::]:80 default_server;
	server_name _;
    root /path/to/root;

    # default project key
    redirectionio_project_key 'KEY TO BE USED BY DEFAULT';

    location /fr/ {
      redirectionio_project_key 'KEY FOR THE fr region PROJECT';
    }

    location /uk/ {
      redirectionio_project_key 'KEY FOR THE uk region PROJECT';
    }

    location /us/ {
      redirectionio_project_key 'KEY FOR THE us region PROJECT';
    }

    ...
}
If the VirtualHost already contained some directives in a / location, that you still want to use, then you have to replicate these directives in each of the location blocks.
Using the nginx module with a non-standard nginx install
Our nginx module is one of the recommended ways of integrating redirection.io in Web stacks. We distribute our nginx module for many distributions, which should cover most of the production cases. However, it may happen that your hosting provider or provisioning solution installs a custom version of nginx, in non-standard paths or with incompatible dependencies.
This section will guide you through the steps to get our nginx module work with your custom nginx install, whatever its setup. The only requirement is the nginx version, which must at least be NGINX 1.9.11.
Download and build the libredirectionio library
The libredirectionio library is a Rust library that processes redirects and filtering from rules created using redirection.io. This library is used in our various proxies, and specifically in the nginx module.
-
Install Rust compilation tools:
# Debian-based distribution apt install autoconf build-essential curl wget unzip curl https://sh.rustup.rs -sSf | sh -s -- --default-toolchain stable -y # RedHat-based distribution yum install -y epel-release yum-utils wget pcre-devel openssl-devel libxslt-devel gd-devel perl-ExtUtils-Embed GeoIP-devel google-perftools-devel httpd httpd-devel curl yum -y groupinstall 'Development Tools' curl https://sh.rustup.rs -sSf | sh -
Get the libredirectionio library sources:
cd /tmp wget -O libredirectionio-master.zip https://github.com/redirectionio/libredirectionio/archive/master.zip unzip libredirectionio-master.zip cd libredirectionio-master -
And build the library:
autoreconf -i && \
./configure && \
make clean && \
make && \
make install
If the compilation is successful (it might be long), you should get a target/release/libredirectionio.so static library.
Download and build the module source
The redirection.io's nginx module is available as an Opensource project in our github account.
-
First, install some compilation tools and utilities:
# Debian-based distribution apt install nginx gawk libssl-dev libpcre2-dev libzip-dev libxml2-dev libxslt-dev libgd-dev libgeoip-dev libperl-dev # RedHat-based distribution yum module enable nginx:1.20 # or whatever version of your choice yum install nginx -
Retrieve redirection.io module sources (pick the last release from our repository):
cd /tmp wget -O libnginx-mod-redirectionio-master.zip https://github.com/redirectionio/libnginx-mod-redirectionio/archive/master.zip unzip libnginx-mod-redirectionio-master.zip -
Identify the Nginx version of your system:
nginx -v
# displays:
#   nginx version: nginx/1.18.0
This means that the nginx version is "1.18.0"
-
Get nginx sources for this version (of course, use the right version number, from the above command):
cd /tmp wget http://nginx.org/download/nginx-1.18.0.tar.gz tar -xzvf nginx-1.18.0.tar.gz cd nginx-1.18.0 -
Then, build the module:
# retrieve your local nginx configure options
export NGINX_CONFIGURE_ARGUMENTS=`nginx -V 2>&1 | grep 'configure arguments:' | cut -d" " -f3- | sed "s/ --with-cc-opt='/ --with-cc-opt='-I\/tmp\/libredirectionio-master\/target /" | sed "s/ --with-ld-opt='/ --with-ld-opt='-L\/tmp\/libredirectionio-master\/target\/release /"`
eval "./configure $NGINX_CONFIGURE_ARGUMENTS --add-dynamic-module=/tmp/libnginx-mod-redirectionio-master"

# build the module
make -j modules
Install and load the module in nginx
Installing the module should be quite straightforward in most cases - you simply have to move the compiled file to the right folder.
Usually, the following command should show the nginx modules directory location:
nginx -V 2>&1 | gawk 'match($0,/--modules-path=(\S+?)/,a) {print a[1]}'
# should display something like:
#   /usr/lib/nginx/modules
Then, move the module in this folder (of course, use the directory name returned by the command above):
sudo mv objs/ngx_http_redirectionio_module.so /usr/lib/nginx/modules/
Last step, you now have to load the module in nginx - for this, add a load_module directive in nginx.conf, something like:
load_module modules/ngx_http_redirectionio_module.so;
You may also want to add this line in a separate file, to keep track of your own changes. Most of the time, the main nginx configuration file includes module files (for example, include /etc/nginx/modules-enabled/*.conf;) - so feel free to create your own /etc/nginx/modules-enabled/mod-http-redirectionio.conf config file.
Restart nginx, and you're done!
sudo systemctl restart nginx.service
You can check that the module fully works by completing its configurations steps in the VirtualHost.