The instructions below have been customized for your project "".
Customize these instructions for the project
platform.sh integration
This knowledge base article explains how to setup and configure redirection.io on platform.sh or Symfony Cloud hosting environments, in order to let your SEO or marketing team check the HTTP traffic and fix SEO issues in an easy and flexible way.
What is platform.sh? What is Symfony Cloud?
platform.sh is a PaaS: it provides a fully managed hosting environment, built to ease up the setup of a scalable and maintained hosting platform. The goal of such hosting providers is to provide an efficient way to build feature-full Web platform, without the need for a complex infrastructure design or repetitive ops or sysadmin operations.
Shortly said, Symfony Cloud is a commercial offer tailored for the Symfony framework, and built on the technical platform of platform.sh.
Some legal stuff: while we believe that both platform.sh and Symfony Cloud do a great job, this guide does not imply that we endorse or advise their services. They own their trademarks, we are not affiliated, etc. etc.
In the rest of this guide, we will mainly provide instructions for platform.sh. If you deploy your project on Symfony Cloud, the principles are the same, only a few terms change:
- the
.platformfolder is named.symfony - the
.platform.app.yamlfile is named.symfony.cloud.yaml
Install layout
platform.sh proposes many services out of the box (Elasticsearch, Memcached, Varnish, etc.) that can be enabled in a hosted project with only a few lines of YAML. Unfortunately, platform.sh does not provide a native redirection.io integration (which would be useful, isn't it?), but it is possible to get it running in a performant way with few configuration.
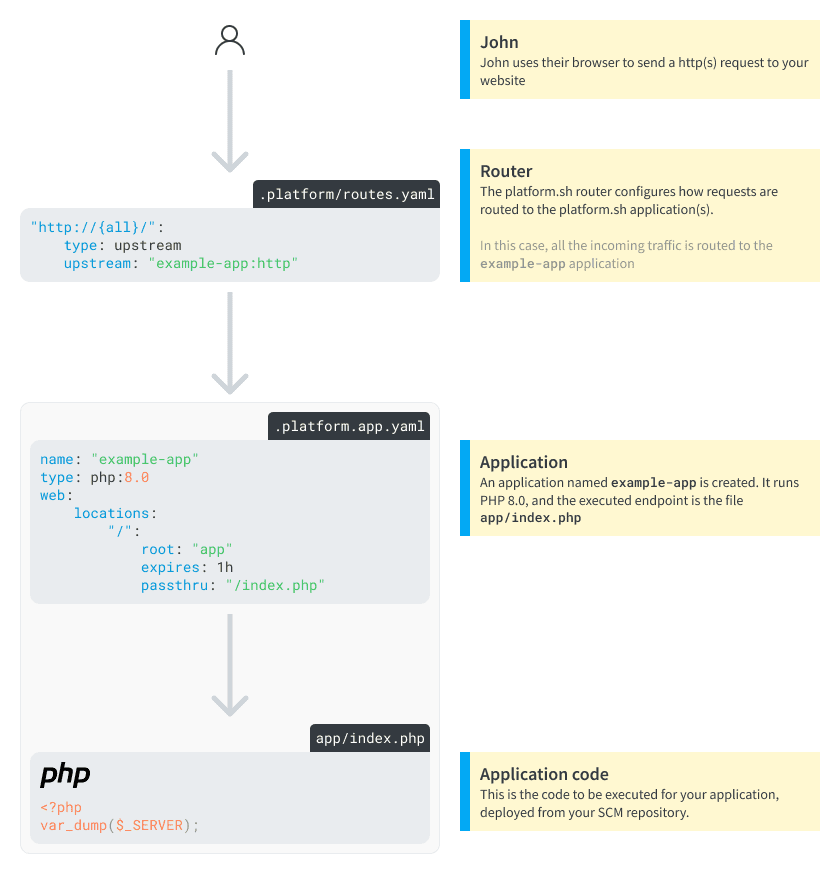
A schema is worth thousand words, so here is a standard platform.sh application layout:

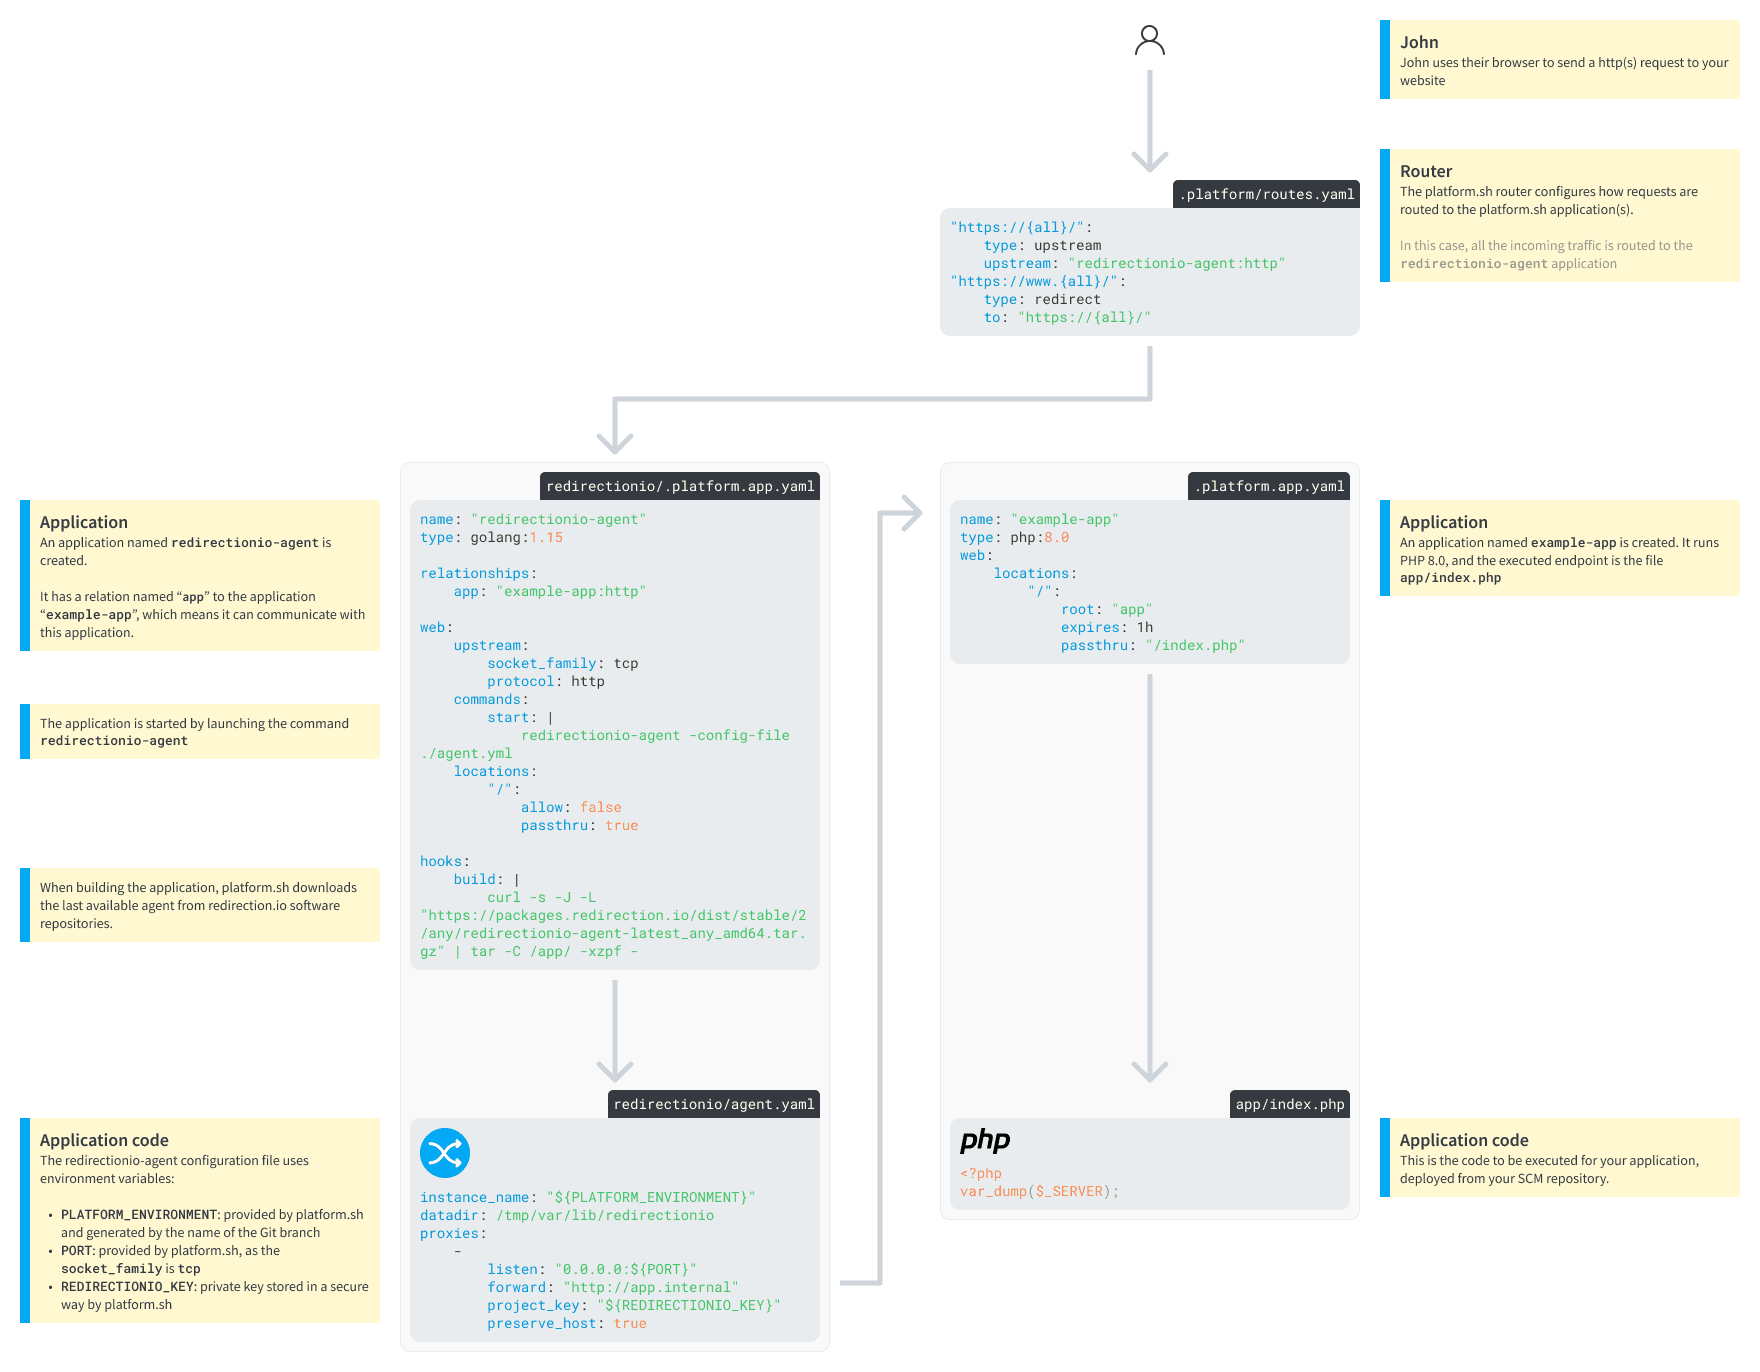
And here is the layout that is going to be used with the redirection.io agent installed:

In this setup, the incoming HTTP(s) requests are routed to the redirection.io agent in reverse-proxy mode, then passed to the applicative backend. The redirectionio-agent http(s) reverse-proxy is very performant and does not have a significative nor noticeable impact on overall performance, which makes it an ideal solution to fix SEO issues on the fly, at the edge of your infrastructure.
If you are busy and want to test our solution right away, please click this button to use a pre-defined project template:
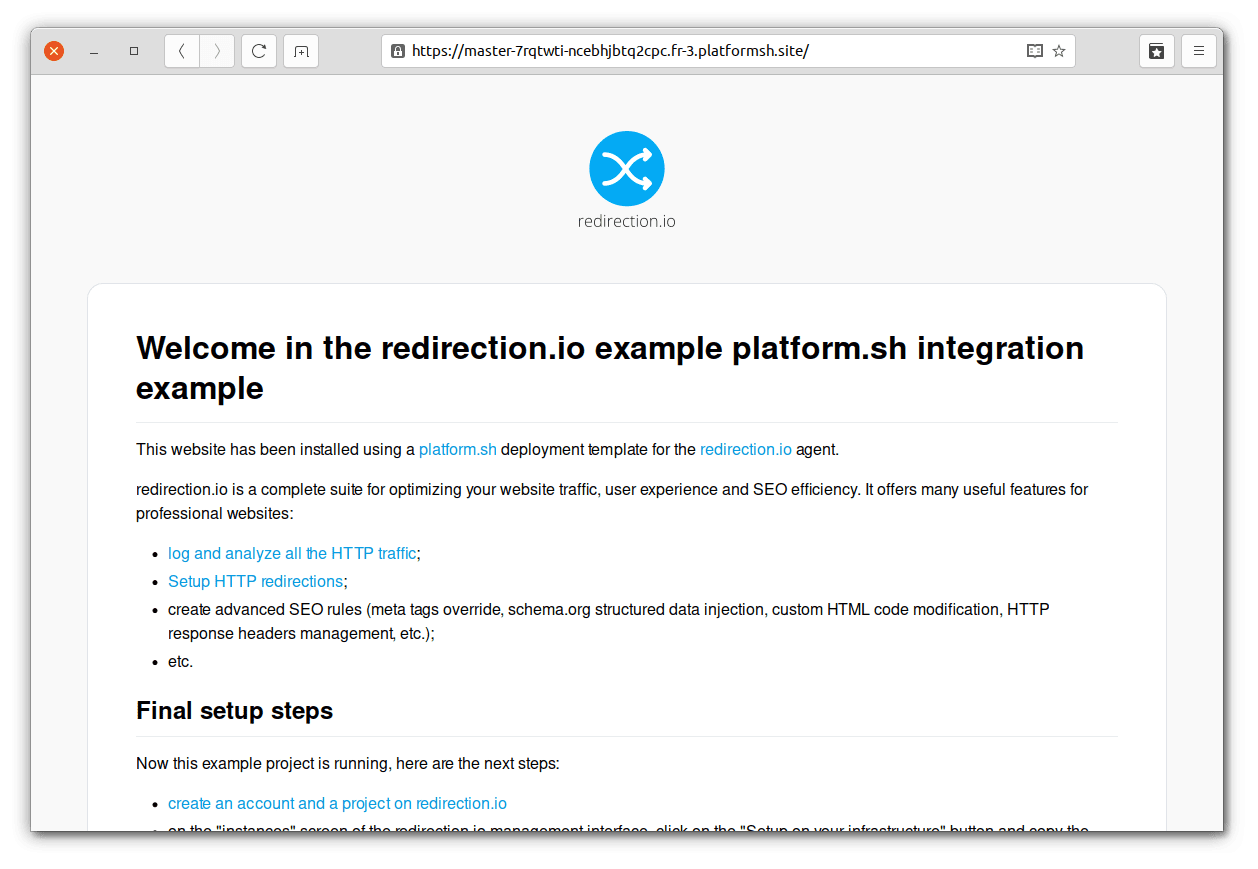
This will create a base platform.sh project with redirection.io installed:

Setup your application
First, setup your application with platform.sh as you would do without using redirection.io. So, for an application named app, here is the traditional architecture:
├─ .platform
   ├─ routes.yaml        # defines the routes of the platformsh deployment
   └─ services.yaml      # defines the services required by the application
├─ app/                  # contains your application code
   └─ index.html
└─ .platform.app.yaml    # the "app" platform.sh application configuration
The .platform/routes.yaml file defines how to route the traffic within the platform.sh app. Usually, you will want to send all the traffic to your application:
"https://{all}/":
    type: upstream
    upstream: "example-app:http"

"https://www.{all}/":
    type: redirect
    to: "https://{all}/"
The .platform/services.yaml can be left empty, if your app does not have an external dependency. Else, you can add one of the supported services. In .platform.app.yaml, configure the platformsh application (name, disk size, type of application, etc.). For example:
# .platform.app.yaml
name: example-app
type: golang:1.15
build:
    flavor: none
disk: 128
web:
    locations:
        "/":
            root: "app"
            passthru: "/index.html"
Setup the redirectionio-agent
As the redirectionio-agent is a simple binary with no external dependency (no database, etc. is required), you just have to install the agent binary as a platform.sh application, as explained in the Multiple applications documentation guide.
First, create a second platform.sh application:
└─ redirectionio
   ├─ .platform.app.yaml  # the "redirectionio" platform.sh application configuration
   └─ agent.yaml          # the redirectionio-agent configuration
In redirectionio/agent.yaml, define the redirectionio-agent configuration directives as explained in our documentation:
# /redirectionio/agent.yaml
instance_name: "${PLATFORM_ENVIRONMENT}"

# Directory where the rules will be persisted
datadir: "${PLATFORM_APP_DIR}/rules"

logging: true

# Run the agent as a reverse proxy
proxies:
    -
       listen: "0.0.0.0:${PORT}" # Listen endpoint
       forward: "http://app.internal" # Remote endpoint
       project_key: "${REDIRECTIONIO_KEY}" # Project key to use
       preserve_host: true # Preserve host header, defaults to false
       request_body_size_limit: 20MiB # accept requests with max. 20MB body size

# Sets log configuration. Each section is optional and independent of one another.
# log:
#   file:
#       level: info
#       path: "${PLATFORM_APP_DIR}/log/agent.log"
Of course, you can adapt the instance_name (here, it is generated based on the PLATFORM_ENVIRONMENT environment variable.
All the agent proxies configuration directives can be used in the proxies: section. In particular, you may want to set the request_body_size_limit directive in order to configure the maximum request size.
In redirectionio/.platform.app.yaml, define the platform.sh application configuration:
# /redirectionio/.platform.app.yaml
name: "redirectionio-agent"

type: golang:1.15

build:
    flavor: none

disk: 128

relationships:
    app: "example-app:http"

hooks:
    build: |
        set -ex
        curl -s -J -L "https://packages.redirection.io/dist/stable/2/any/redirectionio-agent-latest_any_amd64.tar.gz" | tar -C /app/ -xzpf -

web:
    upstream:
        socket_family: tcp
        protocol: http
    commands:
        start: |
            set -ex
            /app/redirection-agent/redirectionio-agent -config-file ./agent.yaml
    locations:
        /:
            allow: false
            passthru: true

mounts:
    # rules will be saved locally in this folder
    'rules':
        source: local
        source_path: rules
    # redirection.io log folder
    'log':
        source: local
        source_path: log
There's not much to explain about this application:
- the
diskdirective defines the size of the attached disk. Depending on your ruleset size, and your redirection.io agent configuration about data persistence, you may want to increase this value; - the
typeof the image used isgolang, but you can use any of the available types. It happens that the golang image is the smallest one; - the
hooks.buildnode downloads the latest release of the redirection.io agent at build time; - the
relationships.appnode allows to "link" both platform.sh applications. Changing this name requires to also change theproxies[0].forwardnode in theagent.yamlfile; - the
web.command.startnode defines how to start theredirectionio-agentbinary with the right configuration; - the
mountssection defines paths that must be made writable to the redirection.io agent
The hook above downloads and installs the last available version of the redirection.io agent software. If you wish to run a fixed version, you can of course replace the download URL - simply use one of the packages available in our repository.
Once you have found the redirection.io project key (in the "instances" screen of the manager, click on the "Setup on your infrastructure" button), add this key as a platform.sh project variable, which will help keep this key secret (and shared across your team):
$ platform variable:create --name env:REDIRECTIONIO_KEY --sensitive true --value "set your key here"
Last step, change the .platform/routes.yaml file to instruct platform.sh to route the incoming traffic to the newly created redirectionio-agent application instead of the app application:
# .platform/routes.yaml
"https://{all}/":
    type: upstream
    upstream: "redirectionio-agent:http"

"https://www.{all}/":
    type: redirect
    to: "https://{all}/"
Benefits
Once the changes have been made, commit and push to the platform remote. This will trigger a new deploy of your project:
$ git commit -m "let's use redirection.io"
$ git push

(things happen)

Processing activity: John Doe pushed to Master
    Found 1 new commit

    Building application 'example-app' (runtime type: golang:1.15, tree: e7f1eab)
      Generating runtime configuration.
      Executing pre-flight checks...
      Compressing application.
      Beaming package to its final destination.

    Building application 'redirectionio-agent' (runtime type: golang:1.15, tree: 2fd5612)
      Generating runtime configuration.
      Executing build hook...
        W: + curl -s -J -L https://packages.redirection.io/dist/stable/2/any/redirectionio-agent-latest_any_amd64.tar.gz
        W: + tar -C /app/ -xzpf -
      Executing pre-flight checks...
      Compressing application.
      Beaming package to its final destination.

    Redeploying environment master
      Preparing deployment
      Closing services example-app, router, and redirectionio-agent
      Opening application example-app and its relationships
      Opening environment
      Environment configuration
        example-app (type: golang:1.15, size: S, disk: 128)
        redirectionio-agent (type: golang:1.15, size: S, disk: 128)

      Environment routes
        http://master-XXXXXXXXXX.platformsh.site/ redirects to https://master-XXXXXXXXXX.platformsh.site/
        http://www.master-XXXXXXXXXX.platformsh.site/ redirects to https://www.master-XXXXXXXXXX.platformsh.site/
        https://master-XXXXXXXXXX.platformsh.site/ is served by application `redirectionio-agent`
        https://www.master-XXXXXXXXXX.platformsh.site/ redirects to https://master-XXXXXXXXXX.platformsh.site/
Send a HTTP(s) request to your application URL, and you should see some traffic logged in the redirection.io manager. You can now audit your traffic, create redirects and fix SEO errors with ease!
Next step, learn how to create your first redirections!
